Did you ever want to control GPIO from scratch2 ? Or other sensors connected to a raspberry pi ?
The last days I worked on connecting scratch2 with GPIO on raspberry and more.
To be precise, this is done by either using scratchx or since june 2017 with the standalone version of scratch2 for raspbian.
- use scratch2 version named scratchX which supports ‘scratch extensions’. This version is identical to scratch2 with few limitations. Or use the standalone version on raspberry.
- extending scratchClient to talk with scratch2 and providing sensor values and events, but also receive values from scratch2 and events.
- scratchClient using adapters to connect peripheral devices as usual. For example to GPIO.
- The blocks in scratchX are defined from the information available in the config file used by scratchClient.
This new version of scratchClient is still supporting scratch1.4 and there are no changes in the config files needed.
One of the limitations in scratchX are that sharing projects is not possible.
The extension blocks in scratchX are defined using the definitions from the config xml file from scratchClient. So there is no programming effort needed to build the extension file.
Current implementation allows to send/receive values and events from scratchX to/from scratchClient. This is similiar to the features available in scratch1.4 with the broadcast system.
Problems, Inconsistencies with scratch 1.4 broadcast system
In legacy 1.4 scratch, there are some predefined blocks for motors and sensor names for scratchBoard. This needed many explanations for unexperienced users to avoid confusion.

scratch 1.4 motor blocks in sensing palette
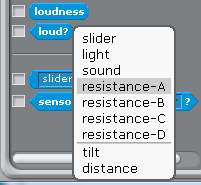
scratch 1.4 default sensor names
It was also difficult to explain that values from scratchClient are received as sensor values, but values to be sent out need to be defined as variables ‘for all sprites’.
In addition to this, the extra step ‘enable remote sensor connections’ is hidden down in a context menu of a block on lower edge of the window.
Advantages of the scratch2, scratchX block based interfacing
In scratchX, all the capabilities of the external system are exposed as blocks. This avoids all the mentioned problems from legacy scratch 1.4.
Modifications in scratchClient
scratchClient in its initial design is scratch1.4 centric. The start and stop logic is scratch 1.4 oriented and needed another structure.
During this work, the internal web app was lifted to use tornado framework. Which has build in websocket support and is easier to use as cherrypy. As scratchX is online only, the connection to a local data provider needs to bypass the ‘same server policy’ and this was quite simple to achieve with tornado.
Monitoring and simulation of events is still possible by using the internal web server. Some bugs have been removed in the web pages on this way.
Setup procedure
As the experimantal scratchClient is merged into scratchclient, the installation is same as for scratchClient.
Start scratchClient with the configuration xml file for your hardware. I recommend using python3 to run scratchClient. Unicode support is the reason for this.
Context
scratch2 / scratchX does not need to run on same computer as scratchClient. The communication beween scratchX and scratchClient uses websocket and http requests. In my test environment, scratchX runs on windows and scratchClient either on a raspberry or on windows.
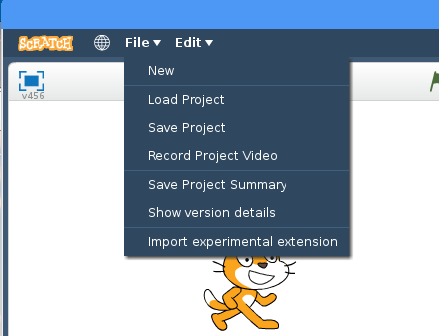
Start scratchX
Load http://scratchx.org/#scratch into the browser.
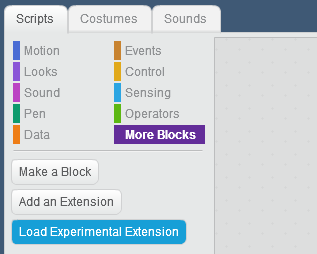
Load extension loader
In ‘more blocks’, ‘Load Experimental Extension’,
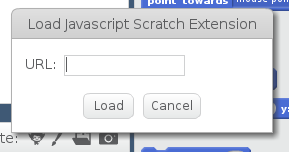
press on Load Experimental Extensions and open Extension URL
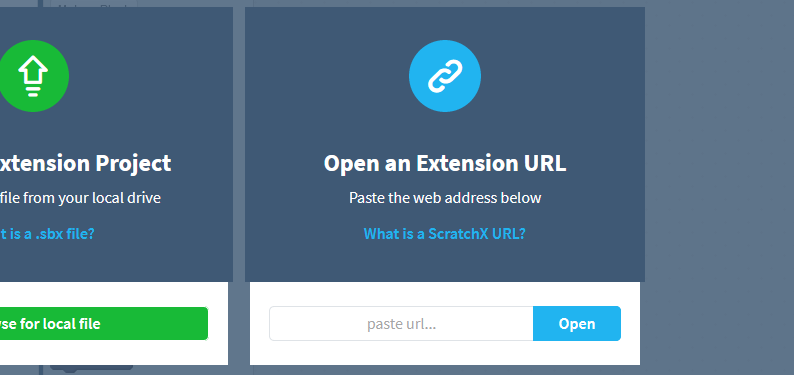
Paste the following url into the form
https://megjlow.github.io/extensionloader.js
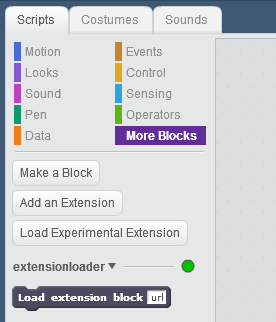
This url brings the Load Extension Block into the additional block palette.
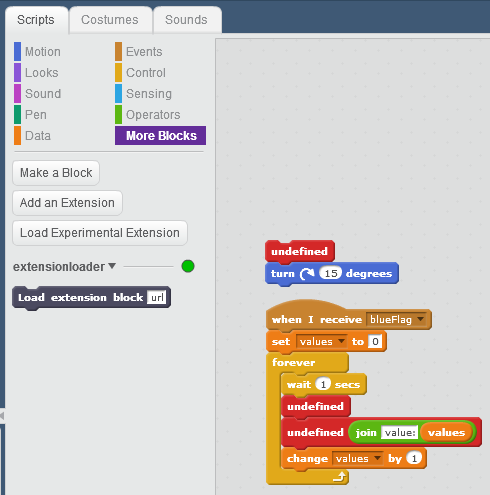
Connect to scratchClient
The Load Extension Block is now used to load the scratchClient configuration. Best practice is to prepare a small script in stage which loads the scratchClient config.

Add a wait block before the ‘broadcast [blueFlag]’ with 5 seconds. This gives the extension the needed time to load and to initialize.
The program should use ‘blueFlag’ in all places where the green flag hat  is usually used.
The url to use to load the scratchClient extension is
http://localhost:8080/scratchx/js/extension.js
Copy paste this url into the ‘load extension block’. If scratchClient is running on a different computer, change ‘localhost’ to either the other computer’s IP-address which is something like 192.168.2.203 or perhaps a more meaningful name if the network configuration allows.
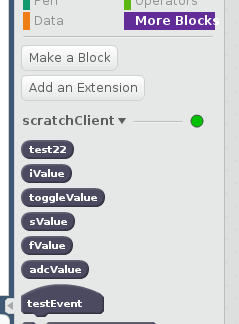
Validation
See the ‘green’ dots to the right of the extension name. If these turn red, connection is lost. Possibly scratchClient has been stopped, can’t be reached or other problems. In my tests the connection was stable.

Extra step for the preview: start legacy scratch and open remote sensor connection.
Loading a project using scratchClient extension
A program loaded from file system shows the Load Extension Block, but not the scratchClient extension. The blocks from the scratchClient extension are displayed as red blocks.
When program is started with green flag and the proposed initial script is executed, the Load Extension Block reads the extension from scratchClient and the program can be used.
Start scratch2 on raspbian
In raspbian jessie june-2017, there is a standalone scratch2 version available.
Start from programming/scratch2.
Press shift key and the file menu. The file menu now displays more options.
Select import experimental extension.
Paste the url into the dialog: http://localhost:8080/scratchx/js/extension.js
Validate in ‘more blocks’. The example here is for a test adapter and looks different for your configuration file.
This scratchClient version is released
There are no known limitations for this release.
Just start scratchClient and use either scratch1.4 (enable remote sensor connections) or follow the procedure to set up a scratch2/ scratchX connection.
Some features have been removed. Command line switches to control the gui are removed. As the web app server is needed to connect to scratchX, this does not allow to disable the web browser.
Example: Controlling two wheel robot pi2go with scratch2
The tests for the scratchX integration have been performed with a new pi2go-configuration. This includes GPIO, PWM, hardware PWM and ADC chips.
The monitoring/simulation web page display the many inputs and outputs available for this robot.

Not all adapters fit on the page.
The blocks build from this config in scratchX are (not all blocks shown).

On stage, there are the lights reporters and distance reporter visible.