Category Archives: scratchClient

scratchClient related things

scratch Art Project

Having some spare time in the scratch course at school, we did a short ‘computer art project’.

A short introduction to the topic was presented, some materials taken from the following web pages:
https://gigers.com/blog/computerkunst-mit-snap-wiederholung-und-zufall/
– https://monoskop.org/images/2/25/- Reichardt_Jasia_ed_Cybernetic_Serendipidity_The_Computer_and_the_Arts.pdf
http://joachim-wedekind.de/Downloads/AtlasComputerkunst_redsize.pdf

The task for the kids, 7th class, was to use simple geometrical patterns combined with some randomness.

Using scratchClient, a pen plotter axidraw SE/A3 was connected for the class room. A standard laptop was used for a plotter server, caching the kids graphics and spooling to the hardware.

Kids worked on RPi4 boards, scratch3 local and sccratchClient (for scratch3) as a backend.

Results

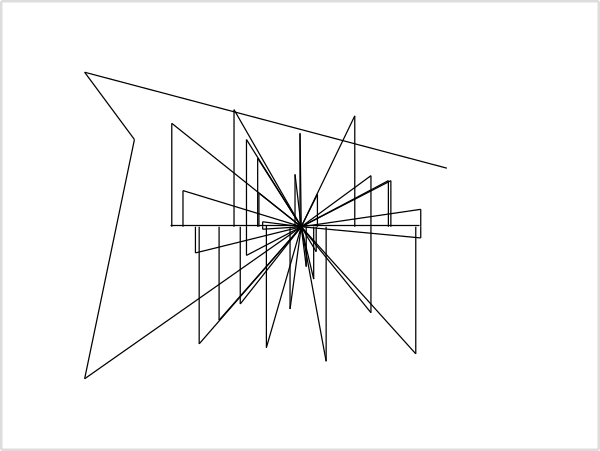
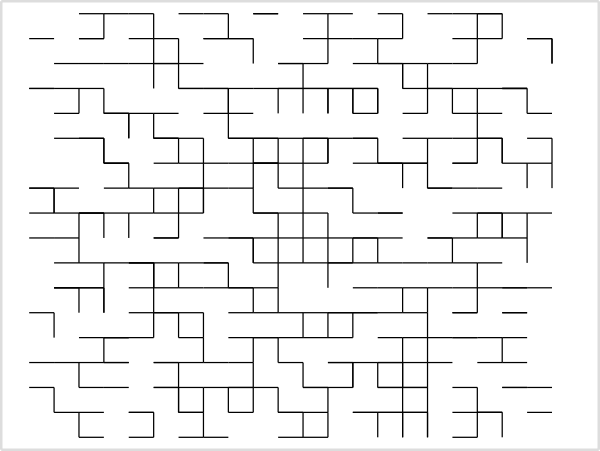
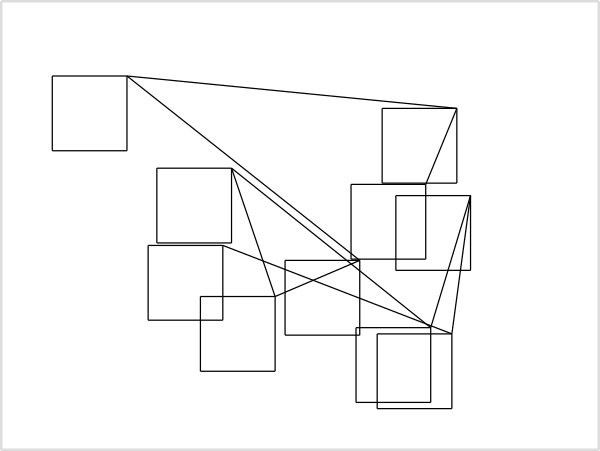
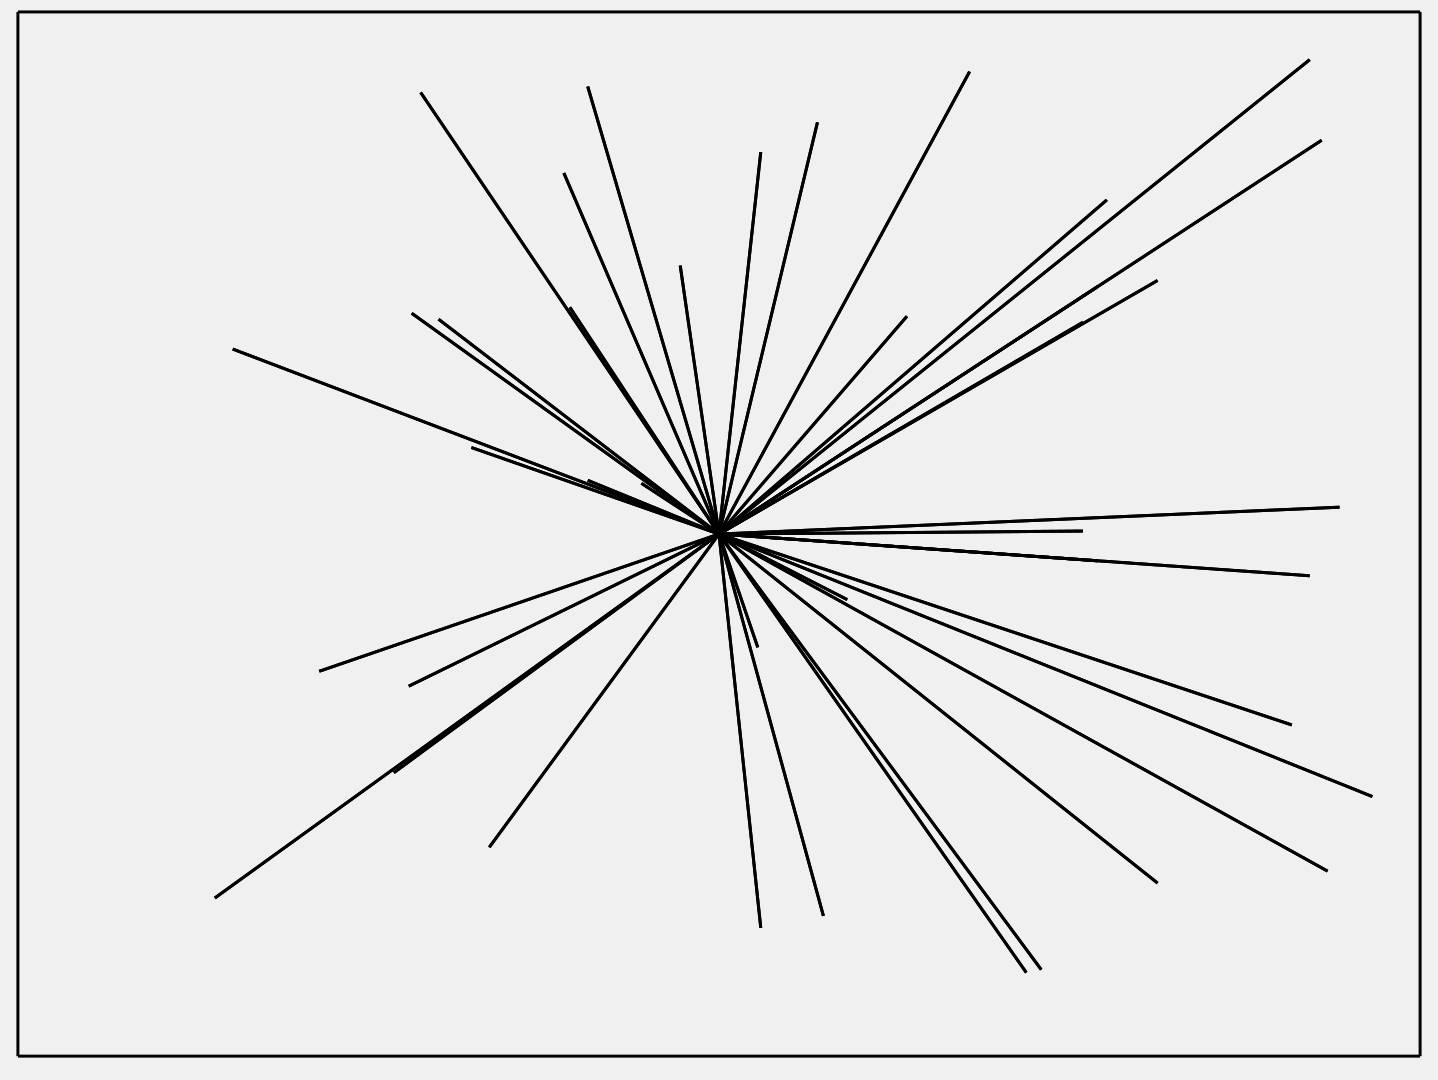
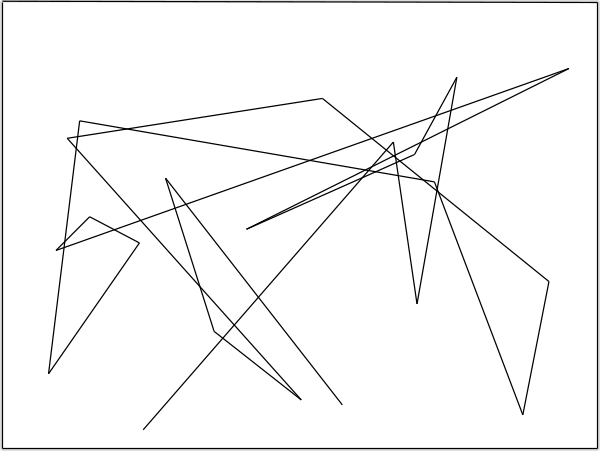
The kids hat a lot of fun working on this project. Within 90 minutes, there have been about 500 images produced (a lot of them just to see how ‘randomness works’), a total of about 420.000 graphical commands.

Some results produced have been plotted. The images presented here have been converted from the scratch graphical commands to svg images, then to pixel graphics.

The images are published with a copyright to the school.

copyright Immanuel Kant Gymnasium Leinfelden Echterdingen 2024

copyright Immanuel Kant Gymnasium Leinfelden Echterdingen 2024

copyright Immanuel Kant Gymnasium Leinfelden Echterdingen 2024

copyright Immanuel Kant Gymnasium Leinfelden Echterdingen 2024

copyright Immanuel Kant Gymnasium Leinfelden Echterdingen 2024

System Context

The system fortunately worked pretty good. The scratchClient for the plotter used UDP broadcast to find a plotter server on a laptop. ScratchClient then used a ‘plotter’ adapter so send commands to plotter server.
The plotter server software then caches the results of the eight groups in the course. For the hardware axidraw, the plotterServer scales the output and does some drawing optimizations like reducing redundant pen lift up, down operations.

For the scratch project, a sample project was provided which demonstrated the ‘how it works’. From this, the kids developed their own idea.

Basic plotter commands are

  • begin, end: The wrapper for the plotter Server to separate images
  • up, down: pen move commands
  • goto_x_y x=, y= : absolute move
  • change_x, x=: change x position
  • change_y, y=: change y position.

All commands updated local stage and simultaneously have been sent to plotter server.

Here a sample scratch snippets to draw some nested squares:

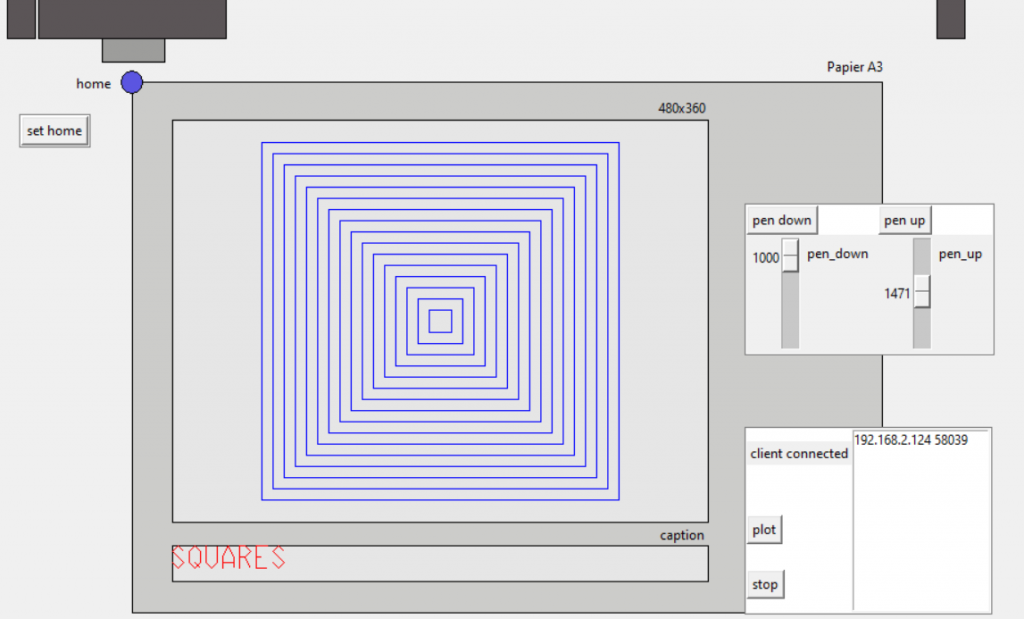
The related output on the plotter server is showing the canvas printed aka the stage visible on the scratch workstations. Some adjustment knobs for pen lifting are needed.

plotter server graphical user interface

Snap! integration with scratchClient

Some work was performed to integrate Snap! with scratchClient. Here a preview of current results.

Snap! is a viable alternative to scratch. Scratch 1.4 on raspberry pi is quite fast, but latest implementation is buggy. Full screen display for example is no longer working. Scratch 2 was based on flash and is not recommended; scratch 3 has again a different extension method and investigation is on todo-list.

The complexity of Snap! blocks is a hurdle for a school environment. Can be handled partially by making blocks invisible. For the menu entries some work needs to be done to hide /preset some of them to avoid confusion for the kids in school.

Snap! sources can be downloaded from https://snap.berkeley.edu/ . It runs from the file system; serving from a local web server as python tornado is easy.

The system context is as with the legacy scratch1.4, 2 integration: have Snap! started, have scratchClient running and the config definitions from the xml config files are exported into Snap!.

Current implementation is proof of concept which concentrates on communication using websocket and configuration setup. Plan is to have a dedicated snap-scratchClient implementation and not to integrate this with legacy scratchClient. This reduces test effort and allows for easier rework of event distribution and web page handling.

Snap sources will be provided from a local tornado server; the data communication also goes to this tornado instance.

When Snap! is started, then scratchClient library needs to be loaded.

Menu entries.

The library list is adjusted by the server. For demonstration purpose only scratchClient- and catch-errors is provided. The server has a whitelist/ blacklist for libraries provided. This is part of the ‘reduce complexity’ effort.

Library list provided by server.

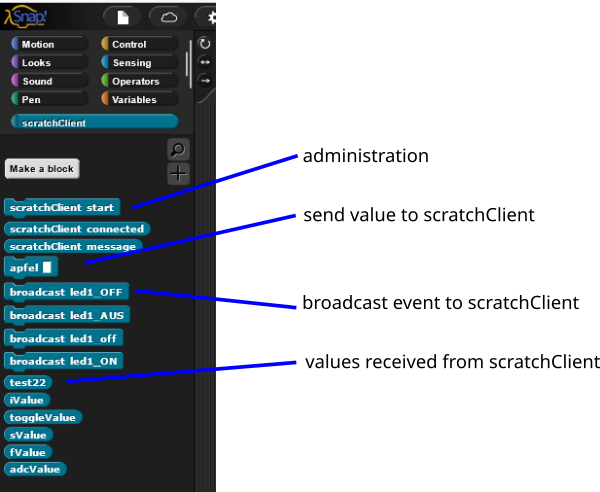
The initial blocks are opened in a category ‘scratchClient’.

scratchClient library blocks.

The command ‘scratchClient start’ initiates the websocket communication to the server and downloads the block definition for current adapter. Based on configuration in scratchClient additional blocks are created.
It should be possible to start the communication with the library import; this needs further investigation.

The ‘connected’ reporter is boolean connection state; ‘message’ is providing last raw websocket messages for debug and will be removed.

Palette created from scratchClient configuration.

Unfortunately there are no ‘hat’-blocks available which could react to events sent from scratchClient. Only way to handle this was to preload the broadcast-event names into the event hat message list.

Technically this is achieved by creating a hidden custom block which uses do_broadcast blocks with the event names.

scratchClient event preloaded into the broadcast hat.

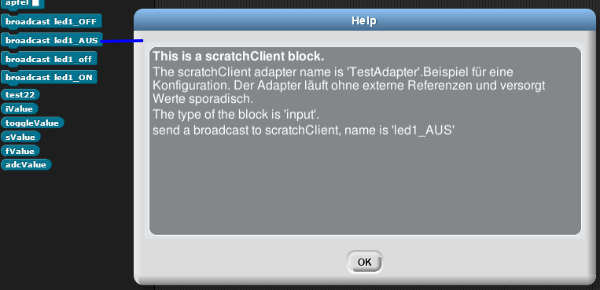
Help text for the blocks is provided by the server, current implementation is generated from scratchClient xml configuration.

Help Text created from adapter XML.

The screenshot shows a mix of information from xml configuration and some text from the server.

<adapter class='adapter.test.TestAdapter' name='TestAdapter'>
		
    <description>A test adapter. Provides Output update every some seconds.</description>
    <description lang="de">Beispiel für eine Konfiguration. Der Adapter läuft ohne externe Referenzen und versorgt Werte sporadisch.</description>
	
    <input name='low'>
	<broadcast name='led1_OFF'/>
	<broadcast name='led1_AUS'/>
	<broadcast name='led1_off'/>
    </input>
...

The configuration snippet shows adapter description for different languages.

New Features: I18N

Translation support is implemented from start.

The adapter xml configurations can be extended with translations. Snap! block definition can be multi language and log messages of the server can be translated.

Work to be done

All the backend implementation needs to be done. scratchClient configuration loading, instantiating of the adapter. Event distribution between the scratchClient modules. Web page redesign of course. And documentation update.

A schedule is not yet available.

scratch 1.4 mesh network with scratchClient

Scratch 1.4 on raspberry pi allows to connect with other scratch instances on other computers.

This is an experimental feature. This feature is not available in scratch1.4 for linux or windows, not in scratch2.

With this feature multiple scratch 1.4 can share events and (global) variables.

As this feature is experimental, there are some constraints and problems especially when scratchClient is used also.

ScratchClient has a feature to interconnect computers too. This uses scratchCommunicationServer.py which allows filtering and segmentation of larger networks.

Enable Mesh Session

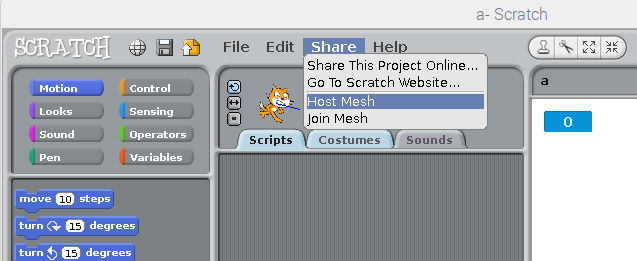
Scratch 1.4 has a ‚Share‘ menu point. This menu has different content when ‚shift‘ is pressed before the mouse click.

Enable mesh session by ‘shift’ and press ‘Share’-menu.

‚Host Mesh‘ means that this scratch is opening the mesh. It ‚hosts‘ the mesh. In other words this scratch becomes a server.

‚Join Mesh‘ means that the scratch connects to a mesh network another computer has opened before. In other words this is a ‚client‘. The client needs to know the IP address of the server.

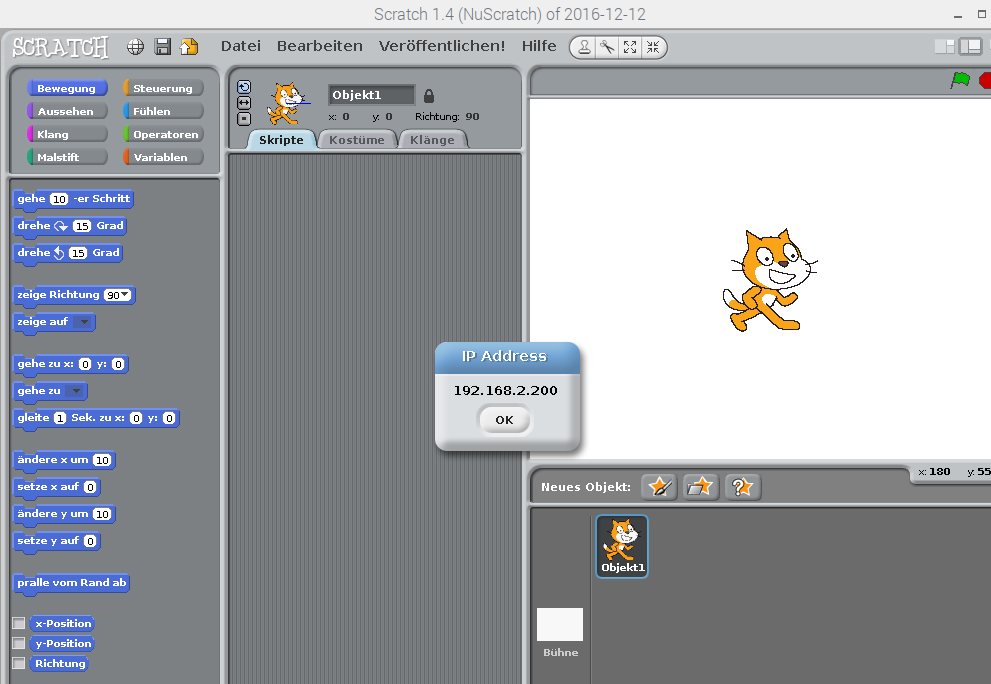
When ‚Host Mesh‘ is executed, the IP address of the computer is displayed.

There is a menu entry on a ‚host‘ computer which allows to display this again:

Computer A:

enable ‘host mesh’ session
display ip address, e.g. 192.168.2.200

Computer B:

join mesh session
enter ip address of computer A

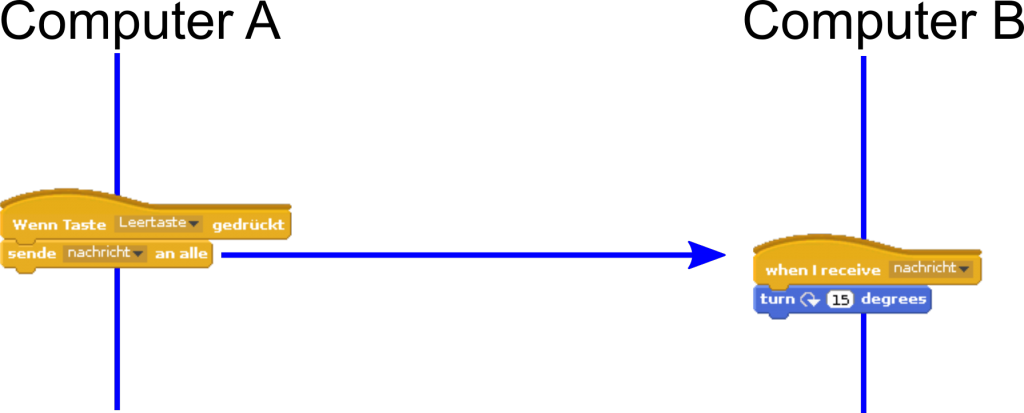
Broadcast events of one computer are sent to computer B also.

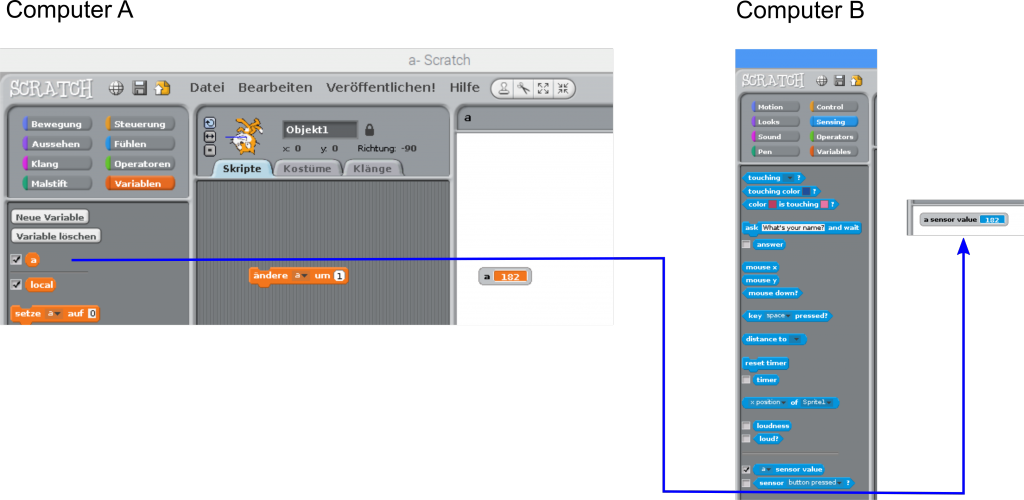
Global variables of one computer are visible on ‘sensing’ tab, sensor values on the other computer.

The variable (here ‚a‘) can only be changed on the one computer where it is is created. Sensor value can‘t be changed.

Best Practice

  • Scope: Variables should be ‘for this sprite only’ whenever possible. Use ‘for all sprites’ only if needed or when these should be transferred to other computer.
  • Naming: Variables and events which need to be transferred should get a special name which includes the sending computer name. So if sending computer is ‘box07’ and variable is ‘a’, then name is ‘box07.name’.

Problems, Constraints

Persist connection

The client side does not store it’s state in the project file. ‘join mesh’ needs to be done each time the project is opened.

Topology with scratchClient

scratchClient connection works on server side only. On client side, when sensor network is enabled then the mesh connection is stopped and thus scratchClient can’t be used.

The ‚enable remote sensor connections‘ command is not needed when ‚Host Mesh‘ is used.

Warning

ScratchClient issues a warning about an unknown command, but this does not stop anything.

Infrastructure

The involved computers need to be connected to a network.

When computers are configured to use fixed IP-Addresses, then for a two computer network a crossover-ethernet patch cable can be used.

Network connection on a raspberry pi.

The color of a cable does not imply whether a normal connection or crossover connection type cable is used.

howto: Edit scratchClient Config Files

There was a question on how to edit scratchClient config files. There was the need to add a Button to a GPIO. Button inputs are handled by a GPIOEventInput-Adapter.

This short walkthrough will not explain all the details but will concentrate on

  • where to find the files
  • use an editor
  • copy / paste an adapter
  • adjust relevant sections
  • save
  • and run it.

Where to find the files

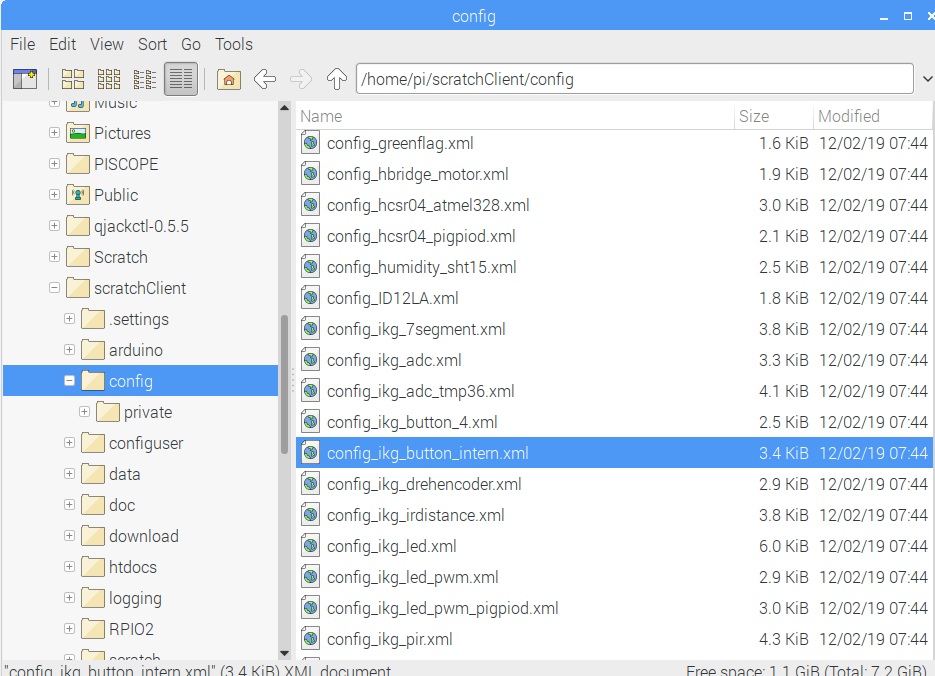
Configuration files for scratch usually are in directory /home/pi/scratchClient/config/ . The ‘/’ at the end is used to mark a path as a directory.

Use an Editor

Config files are XML-Files, eXtensible Markup Language with the ending ‘.xml’. There are special editors for these files, but as xml is plain text a text editor can be used to edit.
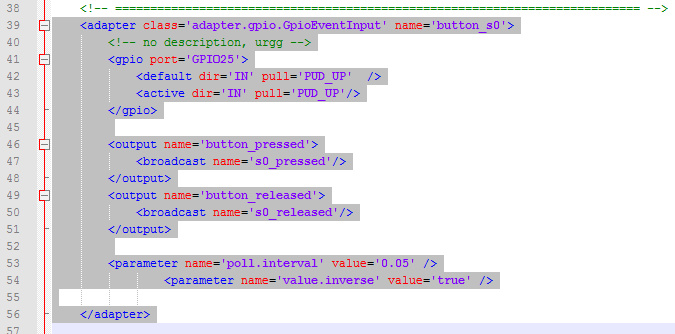
For almost each adapter type there is a sample in these files. We start to edit the marked file config_ikg_button_intern.xml as it already contains a GpioEventInputAdapter which will be modified. Right-click on the file and select ‘open with – Text Editor’.

When the file is open, there are sections visible in brackets. Adapter definitions start with <adapter> and end with the next </adapter>. There can be multiple of these sections in one config files which are activa6ted by scratchClient at a time.

The adapter is light grey marked in the above screenshot. The colors are different between various editors.

Copy / Paste an Adapter

Copy this adapter and paste behind an existing adapter, behind the </adapter>-element. The sequence in the file is not important. You will notice that the sequence is used for the display in the adapter view in the browser. But technically all adapters work the same independent from their position in the file.

Adjust relevant sections

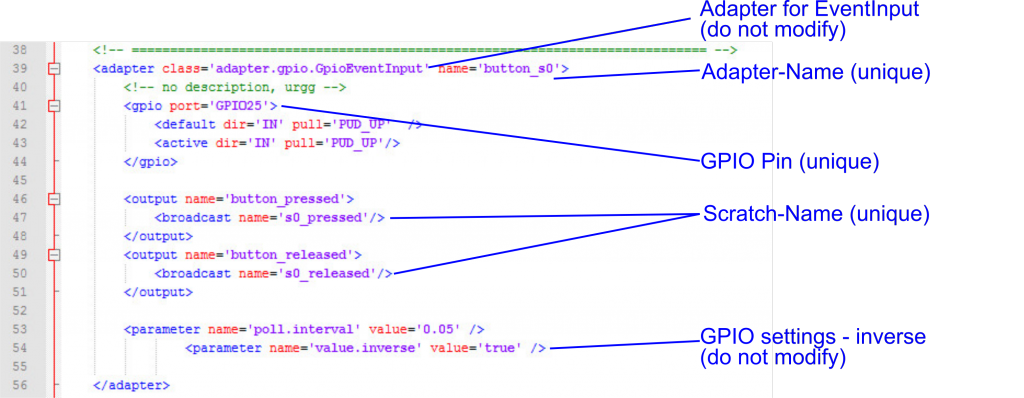
The config file provides the data for scratchClient hoq the adapter shall work. Some of the information needs to be unique, other information is needed to have meaningful names in scratch.

  • Adapter-Name: give the adapter an unique name. Best is to use a name which is close to its use in the system, e.g. ‘button_22’ or better ‘button_motor_left’. The ikg_config files are quite generic and therefor have most times just numbers. As you will use these files for a project, choose more meaningful names.
  • GPIO-Pin: A GPIO pin is only allowed once in a file. Select a free GPIO pin. The numbering scheme is BCM-numbers. Do not choose GPIO used for SPI, I2C or the Hat-eeprom. These names are case sensitive.
  • Scratch-Name: an event-adapter has two event outputs for button_pressed and button_released. These need to be mapped to the names used in scratch. Use a meaningful name like ‘button_motor_left_pressed’ and ‘button_motor_left_released’.
  • The GPIO settings are ‘inverse =true’ for a button which is connected between GPIO and ground. Leave as it is. The poll.interval is 50 ms which is fast enough for even fast games.

Save the file

Save the file in a different location. Choose directory /home/pi/scratchClient/configuser/ which is dedicated for user files.
Files in userfiles are searched first at scratchClient startup. And will never be overwritten on updates.
Give the file a name which is releted to the project, e.g. config_project.xml. The extension ‘.xml is needed.

Run the file

Start scratchClient.

cd ~/scratchClient
python3 src/scratchClient.py -c userconfig/config_project.xml

The command line in scratchClient allows some flexibility to lookup the config files. The -c option allows to omit the extension and the prefix ‘config_’. The lookup procedure first looks in ./userconfig/’, if not found in ‘./config/’. The following command line is performing the same file lookup as above.

cd ~/scratchClient
python3 src/scratchClient.py -c project

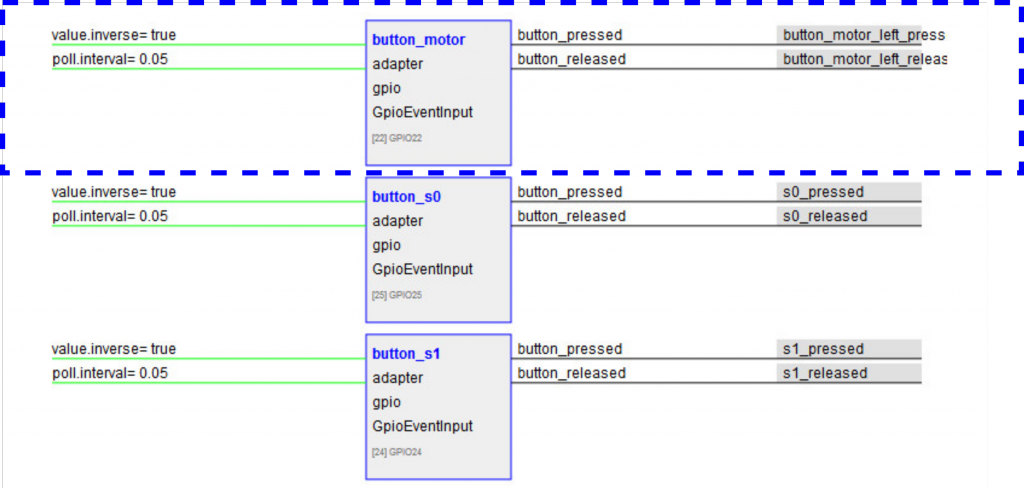
Check the scratchClient browser adapter view localhost:8080.

The name button_motor is visible. The quite long scratch names are truncated, but this only in the view.

Editing a .xml file can be a challenge. If there are problems, scratchClient will reject to load the file and give error messages in the console.

scratch2 connected to scratchClient

Did you ever want to control GPIO from scratch2 ? Or other sensors connected to a raspberry pi ?

The last days I worked on connecting scratch2 with GPIO on raspberry and more.
To be precise, this is done by either using scratchx or since june 2017 with the standalone version of scratch2 for raspbian.

  • use scratch2 version named scratchX which supports ‘scratch extensions’. This version is identical to scratch2 with few limitations. Or use the standalone version on raspberry.
  • extending scratchClient to talk with scratch2 and providing sensor values and events, but also receive values from scratch2 and events.
  • scratchClient using adapters to connect peripheral devices as usual. For example to GPIO.
  • The blocks in scratchX are defined from the information available in the config file used by scratchClient.

This new version of scratchClient is still supporting scratch1.4 and there are no changes in the config files needed.

One of the limitations in scratchX are that sharing projects is not possible.

The extension blocks in scratchX are defined using the definitions from the config xml file from scratchClient. So there is no programming effort needed to build the extension file.

Current implementation allows to send/receive values and events from scratchX to/from scratchClient. This is similiar to the features available in scratch1.4 with the broadcast system.

Problems, Inconsistencies with scratch 1.4 broadcast system

In legacy 1.4 scratch, there are some predefined blocks for motors and sensor names for scratchBoard. This needed many explanations for unexperienced users to avoid confusion.
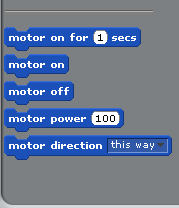
scratch 1.4 motor blocks in sensing palette
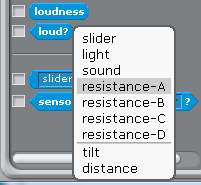
scratch 1.4 default sensor names

It was also difficult to explain that values from scratchClient are received as sensor values, but values to be sent out need to be defined as variables ‘for all sprites’.

In addition to this, the extra step ‘enable remote sensor connections’ is hidden down in a context menu of a block on lower edge of the window.

Advantages of the scratch2, scratchX block based interfacing

In scratchX, all the capabilities of the external system are exposed as blocks. This avoids all the mentioned problems from legacy scratch 1.4.

Modifications in scratchClient

scratchClient in its initial design is scratch1.4 centric. The start and stop logic is scratch 1.4 oriented and needed another structure.

During this work, the internal web app was lifted to use tornado framework. Which has build in websocket support and is easier to use as cherrypy. As scratchX is online only, the connection to a local data provider needs to bypass the ‘same server policy’ and this was quite simple to achieve with tornado.
Monitoring and simulation of events is still possible by using the internal web server. Some bugs have been removed in the web pages on this way.

Setup procedure

As the experimantal scratchClient is merged into scratchclient, the installation is same as for scratchClient.

Start scratchClient with the configuration xml file for your hardware. I recommend using python3 to run scratchClient. Unicode support is the reason for this.

Context

scratch2 / scratchX does not need to run on same computer as scratchClient. The communication beween scratchX and scratchClient uses websocket and http requests. In my test environment, scratchX runs on windows and scratchClient either on a raspberry or on windows.

Start scratchX

Load http://scratchx.org/#scratch into the browser.

Load extension loader

In ‘more blocks’, ‘Load Experimental Extension’,
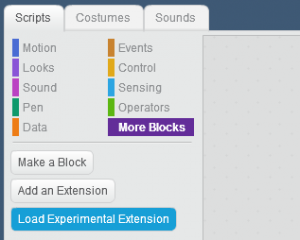
press on Load Experimental Extensions and open Extension URL

Paste the following url into the form

https://megjlow.github.io/extensionloader.js

This url brings the Load Extension Block into the additional block palette.
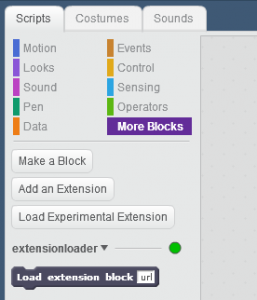
Connect to scratchClient

The Load Extension Block is now used to load the scratchClient configuration. Best practice is to prepare a small script in stage which loads the scratchClient config.

Add a wait block before the ‘broadcast [blueFlag]’ with 5 seconds. This gives the extension the needed time to load and to initialize.

The program should use ‘blueFlag’ in all places where the green flag hat  is usually used.

The url to use to load the scratchClient extension is

http://localhost:8080/scratchx/js/extension.js

Copy paste this url into the ‘load extension block’. If scratchClient is running on a different computer, change ‘localhost’ to either the other computer’s IP-address which is something like 192.168.2.203 or perhaps a more meaningful name if the network configuration allows.

Validation

See the ‘green’ dots to the right of the extension name. If these turn red, connection is lost. Possibly scratchClient has been stopped, can’t be reached or other problems. In my tests the connection was stable.
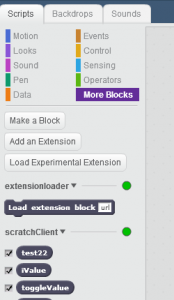
Extra step for the preview: start legacy scratch and open remote sensor connection.

Loading a project using scratchClient extension

A program loaded from file system shows the Load Extension Block, but not the scratchClient extension. The blocks from the scratchClient extension are displayed as red blocks.
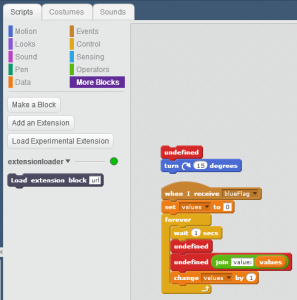
When program is started with green flag and the proposed initial script is executed, the Load Extension Block reads the extension from scratchClient and the program can be used.

Start scratch2 on raspbian

In raspbian jessie june-2017, there is a standalone scratch2 version available.

Start from programming/scratch2.

Press shift key and the file menu. The file menu now displays more options.
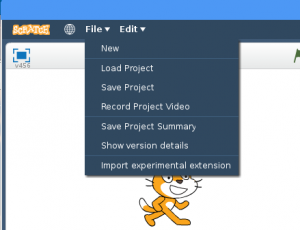
Select import experimental extension.
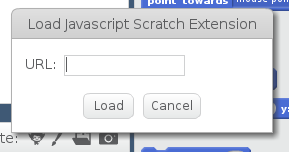
Paste the url into the dialog: http://localhost:8080/scratchx/js/extension.js

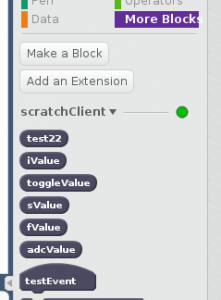
Validate in ‘more blocks’. The example here is for a test adapter and looks different for your configuration file.
This scratchClient version is released

There are no known limitations for this release.
Just start scratchClient and use either scratch1.4 (enable remote sensor connections) or follow the procedure to set up a scratch2/ scratchX connection.

Some features have been removed. Command line switches to control the gui are removed. As the web app server is needed to connect to scratchX, this does not allow to disable the web browser.

Example: Controlling two wheel robot pi2go with scratch2

The tests for the scratchX integration have been performed with a new pi2go-configuration. This includes GPIO, PWM, hardware PWM and ADC chips.

The monitoring/simulation web page display the many inputs and outputs available for this robot.
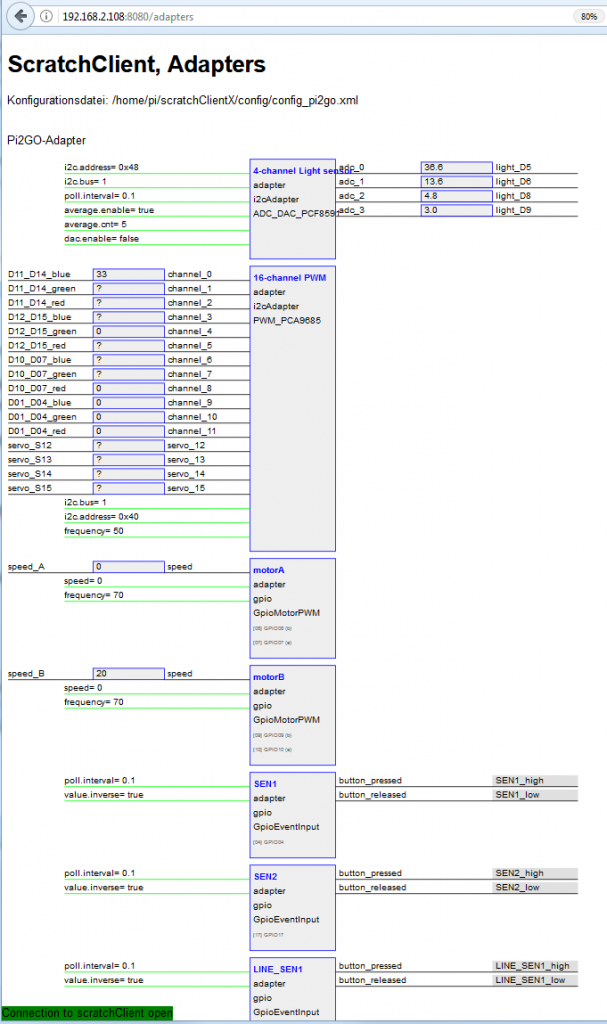
Not all adapters fit on the page.

The blocks build from this config in scratchX are (not all blocks shown).
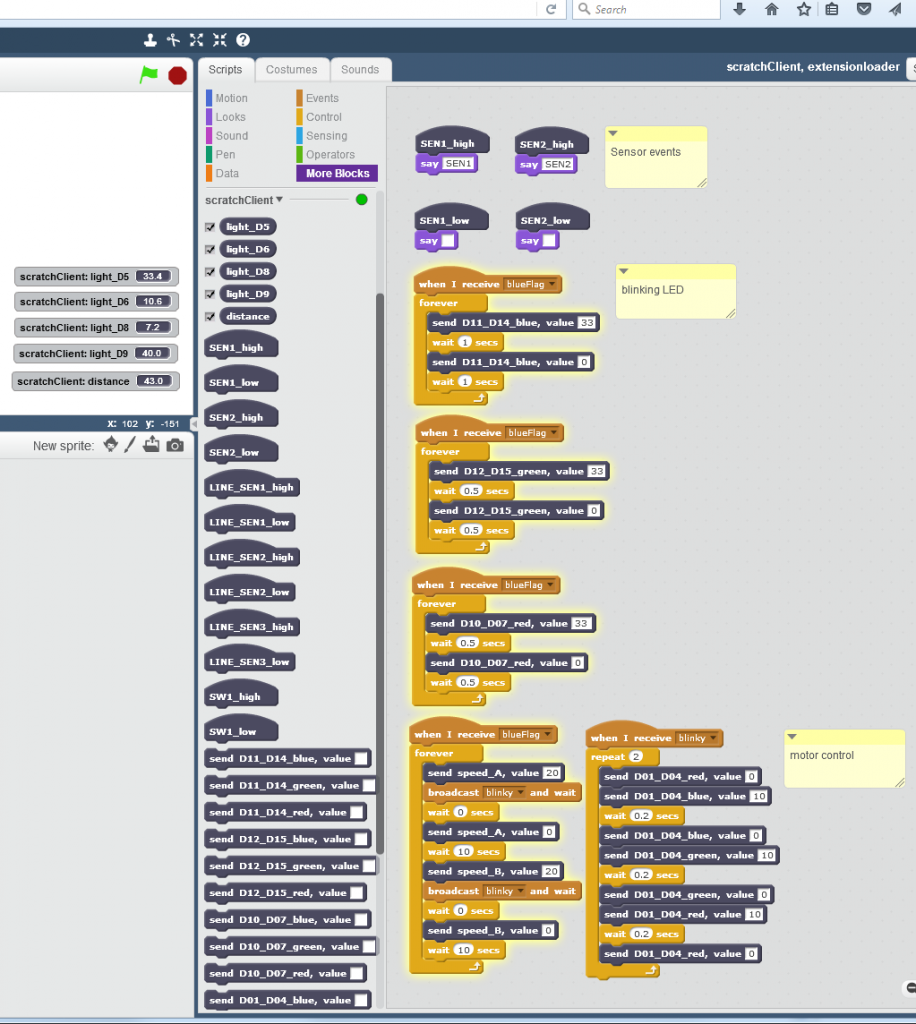
On stage, there are the lights reporters and distance reporter visible.

 

Sonic Pi controlled from scratch

Sonic Pi is great software to produce sounds and to program melodies.

Sonic Pi has an API which allows to use some of the program statements from an external program. There are some places in the web where this feature is used with erlang- or ruby-code.

This adapter for scratchClient and the programming in scratch  is not intended to be a replacement to the Sonic Pi programming language. The reason is the timing of commands in scratch, which is not very precise and command execution delays are audible. But it can be used as a high quality sound generator for scratch games.

The API uses Open Sound Control OSC-format for the messages, so the Sonic Pi commands needs to be packed into this format. This format packs strings into a byte stream with null-bytes as terminators. An example is sending ‘play 60’, which needs the basic parameters ‘/run-code agent-name code’; the agent used is SONIC_PI_CLI and the command part is here ‘play 60’.

The OSC message is as follows

b'/run-code\x00\x00\x00,ss\x00SONIC_PI_CLI\x00\x00\x00\x00play 60\x00'

The strings are zero padded to 4 byte boundaries; the type of option is given by the two string-types ‘s’ after the command.

This conversion is done with the python_osc library; this library needs to be installed in addition to the standard install procedure.

sudo pip3 install python_osc

This library is available for python3 only. As scratchClient is continuously moving towards python3, this is not a restriction.

The software runs on linux and windows. scratchClient and Sonic Pi need to run on same machine, as Sonic Pi accepts only local connections.

Commands are ‘play 50’ for a simple beep, or ‘use_synth :chiplead ; play 80,release: 0.08 ; sleep 0.1 ; play 83, release: 0.08’ for a sequence of notes.

sonic.gif

In scratch, just set a variable sonicpi_cmd to the command needed.
More details in the scratchClient docs in http://www.heppg.de/ikg/administration/ … lient.html

The setup requires to have Sonic Pi running on same computer as scratchClient.
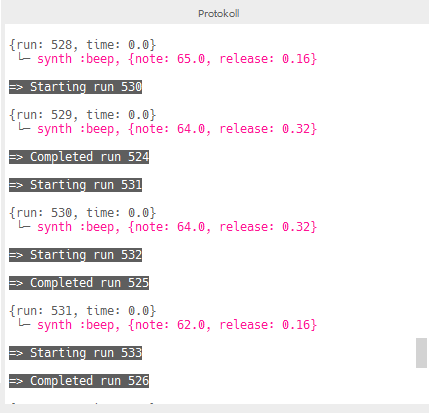
The commands executed are displayed in Sonic Pi window in the protocol-pane.

Errors in commands are displayed in the Sonic Pi window, so when no sound is produced it is a good place to look.

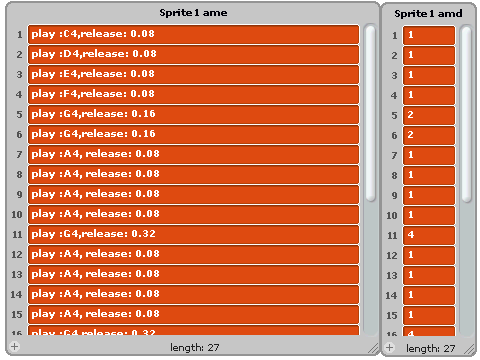
A more advances example is ‘Alle meine Entchen’ played from a list of sounds and a second list with time delays.

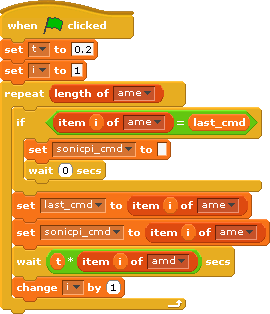
The script uses two lists to produce sound. ‘ame’ is containing sonic pi commands, ‘amd’ is providing timing information.

With these two lists, the script is just iterating through the list and sending commands to sonicpi_cmd-variable. As scratch is not sending out variable information when content does not change, it is needed to reset the information to an empty string in order to get notes repeated.

The scratch 1.4 project can be downloaded here.

Have fun !

scratchClient and scroll_phat_hd

There is a nice little led matrix moard from PIMORONI, “SCROLL PHAT HD”. The form factor is for the pi zero, but it runs well also with a pi 3.

scroll_phat_hd

scratchClient offers support for this board.

The interface allows to set pixel with brightness, write large and somewhat smaller text and of course clear the display.

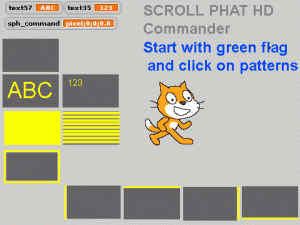
There is a sample scratch script in scratch/scrollphathd/scroll_phat_hd.sb

There are quite a few commands from scratch which need parameters.
This is not a trivial task with scratch. Here a variable is used as a ‘command’-Variable ‘sph_command which receives operation names optionally with parameters.


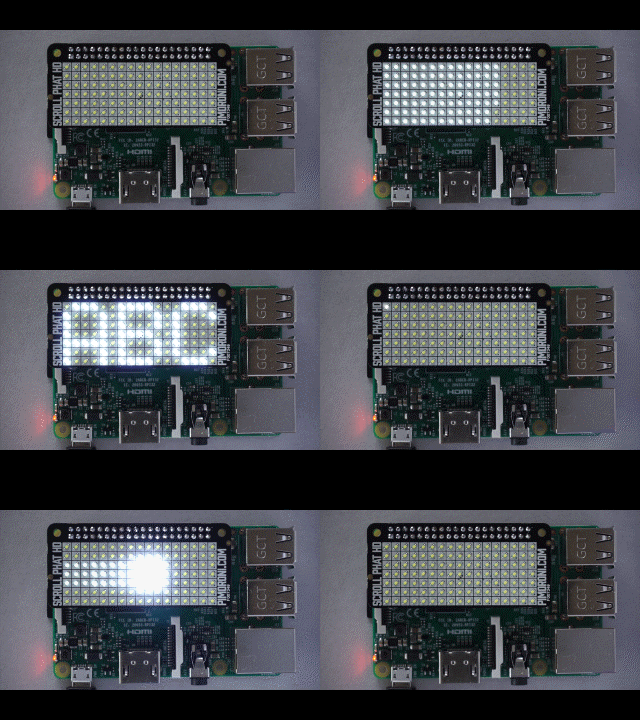
Clear the display. There is also a broadcast command for this ‘clearDisplay’


Set a pixel at x=1, y=1, brightness = 1.0. Valid ranges are x in [0..16], y in [0..6], brightness is [0.0..1.0]. Values out of scope are ignored.


Draw a box between two pixels, here between [0;0] and [17;7] with brightness 0.3. This command effectively sets all led to on.

There are two text variables provided with a 5*7-font and a 3*5 font. Not all chars are supported. The 5*7 font basically supports ascii, the 3*5 font supports digits and some extra chars as ,;.:-_+\/.
The fonts are defined in ‘pseudographics’ in a python file and can easily be expanded.

There is a sample config file available, start scratchClient with

cd ~/scratchClient
python src/scratchClient.py -c config_scrollphathd

The adapter code has been written based on code from pimoroni.

scratchClient with MQTT-Adapter

MQTT Description

MQTT, Message Queue Telemetry Transport, is a is an ISO standard for a publish-subscribe based messaging protocol. It is based on TCP/IP (the ‘usual’ network protocol) and especially designed for small devices and low network bandwidth.

A typical infrastructure contains at least one MQTT-Broker and one to many clients connected to the broker. This infrastructure can be spread to many computers.
A broker just receives messages sent by clients and distributes these to those clients which have subscribed to messages with specific topics.

A MQTT-message is build of a topic and a payload. Topics are strings like ‘home/room1/temperature’ or ‘client1/status’. Payload can be whatever data are needed to be send, this can be strings, binary data as integers, data structures. The broker does not process the data, it is up to the subscriber to ‘know’ how to process the payload.

From the description so far it is clear that there is the need to design the topics in a way that the system is extensible. This is paperwork, most of the time.

There are many more features in MQTT. See the mqtt.org homepage for more details.

scratchClient MQTT-adapter configuration

For scratchClient, the MQTT-adapter can publish messages and subscribe to topics. The topics managed are defined in the config xml. a sample file is included in the distribution.

    <adapter class='adapter.iotAdapter.MQTT_Adapter'  name='mqtt'>
        <description>interface to a mqtt-server</description>
        
        <!--  
           this adapter does implicit input_value and output_value-configuration 
           based on the content of mqtt-Tag.
              mgtt/publish/@variable definitions are used as scratch variable names.
              mgtt/subscribe/@variable definitions are used as scratch sensor names.
        -->
        <extension>
        <mqtt>
            <!--  when @variable is omitted, the topic is taken as variable name -->
            <publish topic="scratch/sample/a_value" />
            <publish topic="scratch/sample/b_value" variable="b_value" />
            <publish topic="scratch/sample/c_value" variable="c_value" />
        
            <subscribe topic="scratch/sample/d_value" variable="d_value" />
        </mqtt>
        </extension>
        
        <parameter name="mqtt.server" value="192.168.2.133"  />
        <parameter name="mqtt.port" value="1883"  />
    </adapter>

ScratchClient needs definitions on which variables to send out ‘publish’ and which ones to provide as sensor values ‘subscribe’.

The publish definition can be as short as the example here. This short definition takes the topic name also for the scratch variable name.

<publish topic="scratch/sample/a_value" />

In scratch, a variable named ‘scratch/sample/a_value’ will be published by the topic ‘scratch/sample/a_value’.

When more control on the scratch variable name is needed, the extended definition can be used:

<publish topic="scratch/sample/b_value" variable="b_value" />

Now a variable in scratch ‘b_value’ is published with topic ‘scratch/sample/b_value’.  I prefer to take the scratch name as the last section in the topic, but the variable name can be any valid name for scratch, e.g. ‘temperature’ or ‘xyz’.

<publish topic="scratch/sample/b_value" variable="temperature" />

For the subscribers, the definition is

<subscribe topic="scratch/sample/d_value"  />

This will result in a sensor value reported with name ‘scratch/sample/d_value’. There is also the possibility to match the sensor name by using the extended form

<subscribe topic="scratch/sample/d_value" variable="temperatureOfSample" />

Please note that wildcards in topics should not be used.

The parameters for the adapter define the connection details

        <parameter name="mqtt.server" value="192.168.2.133"  />
        <parameter name="mqtt.port" value="1883"  />

For the sample, the plain IP-address is given. Use ‘localhost’ or ‘127.0.0.1’ when the mqtt-broker is on same machine.

The MQTT-Adapter is based on eclipse-paho python library and is available on raspberry pi, linux, windows and many more platforms.

For the broker there is mosquitto available for raspberry pi. Just install by

sudo apt-get install mosquitto

This installs the server and starts the server in the background. This is good for a private environment. For a public installation, be sure to look into the docs for securing the environment.

Sample setup

In the scratchClient distribution, there is a sample configuration for a small usage scenario. This requires two computers, as scratch 1.4 with scratchClient can’t be started multiple times on one machine. The sample transmits a button press from GPIO and publishes by a topic ‘scratch/sample/button’ to the second installation, where in scratch a popup is triggered.

The config files are for computer 1 scratch/mqtt/dev_0/device_0.xml
the config files are for computer 1 scratch/mqtt/dev_1/device_1.xml

Be sure to edit the files to have the correct IP-addresses for the mqtt-broker.

On computer ‘dev_0’, there is a button needed from from GPIO17 (BCM) to GND.

   <adapter class='adapter.iotAdapter.MQTT_Adapter'  name='mqtt'>
        <description>interface to a mqtt-server</description>
        <extension>
        <mqtt>
            <publish topic="scratch/sample/button" variable="button" />
        </mqtt>
        </extension>
        
        <parameter name="mqtt.server" value="192.168.2.160"  />
        <parameter name="mqtt.port" value="1883"  />
    </adapter>
    <!-- =========================================================================== -->
    <adapter class='adapter.gpio.GpioEventInput' name='button_s0'>
        <gpio port='GPIO17'>
            <default dir='IN' pull='PUD_UP'  />
            <active dir='IN' pull='PUD_UP'/>
        </gpio>
        
        <output name='button_pressed'>
            <broadcast name='s0_high'/>
        </output>
        <output name='button_released'>
            <broadcast name='s0_low'/>
        </output>
        
        <parameter name='poll.interval' value='0.05' />
        <parameter name='value.inverse' value='true' />

    </adapter>

The scratch code for dev_0 is straightforward.

The adapter GpioEventInput sends events ‘s0_low’ or ‘s0_high’ on button release/ press. The parameter ‘value.inverse’ for this adapter switches high/low values. This is needed here as the button is connected from GPIO to GND and a button pressed is electrically a low signal.
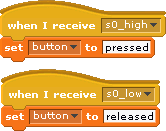
The scratch code translates the button events to variable values for the MQTT-Adapter. When the button is pressed, a value ‘pressed’ is set to variable ‘button’. This variable is then sent to scratchClient where the MQTT-Adapter publishes the value with topic ‘scratch/sample/button’.

With a mqtt-client as mqtt.fx this topic can be observed. The client ‘mqtt.fx’ is a java-fx based tool which unfortunately is not easy to execute on raspberry due to missing fx-libraries. I have this tool running on a windows machine.

For the second device another computer is needed. The config file (here only a snippet) subscribes to the well known topic “scratch/sample/button” and provides the value for a sensor variable ‘button’ in scratch.

<extension>
 <mqtt>
 <subscribe topic="scratch/sample/button" variable="button" />
 </mqtt>
</extension>

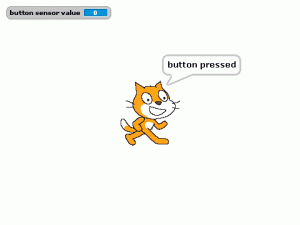
The scratch code is staightforward, the value of the variable is displayed on the stage.

scratchclient is available from the download page  http://heppg.de/ikg/wordpress/?page_id=6

scratchClient singleton reworked

scratchClient needs to run alone, as a ‘singleton’, on one computer. The reason is that concurrent access to GPIO, SPI or other resources could result in unpredictable results.

First approach was to use a pid-file with some logic. At startup, scratchClient writes its own process identification ‘pid’ into a file scratchClient.pid. When another scratchClient is started, it looks for existing pid-file, doublechecks if a process with the recorded pid is running. In this situation, the new started process stopped.

In practice, this situation arised quite often when kids started scratchClient with wrong config file and simply closed the terminal. On a fresh start in a new terminal, the ‘old’ pid file was still existing or even the previous process was still running somewhere. These situations asked too much linux knowledge from kids and teachers and often resulted in unnecessary reboots of the computers.

A better solution is that a new start of scratchClient causes previously started processes to stop. This should work inside one computer and work independent from user permissions on the process: a new scratchClient started by ‘pi’ should be able to stop a previously started process by ‘root’.

The new singleton mechanism uses a socket to achieve this behavior. On startup of scratchClient, socket 42003 is opened as a TCPServer and listens to commands.
A new started process will get errors on opening same socket as a listener, switches to client mode and issues a shutdown command to the server. Next step is then to open TCPServer on this socket.

The video shows this effect with two terminal sessions.

In upper window, scratchClient is started. Another start in lower window causes the first process to stop.

This behavior now is default for scratchClient.

The command line allows to select the singleton mechanics:

-singletonPID        when multiple instances are running, report other instance and 
                     terminate
-singletonIPC        when multiple instances are running, terminate other instance
                     used port 42003 (default from 2017-02-14)
-singletonNONE       no singleton policy applied. For debug only

Summary: new singleton mechanism introduced in scratchClient since Feb 2017.


pi and more 9, workshop ‘raspberry, scratch, gpio’

For the ‘pi and more 9‘ in Trier on 11 june 2016, I had the chance to run a workshop on how to use scratch with gpioserver and as an alternative to use scratch with scratchClient.
Basis setup was to control three LED with a button.

The introduction is available as a pdf-document.
The tutorials are available here: tutorial (de), tutorial (en).

Working with gpioserver was found to be unstable. Quite a few  attendants had problems to get a connection to the hardware. It simply did not work, or they got popups in scratch that connection to pigpiod could not be established. It was needed to stop scratch and restart to get it running. A reboot of the computer was needed to cure the problems where scratch complained about missing pigpio.
In the scratch startup shell script, there is a check for pigpiod, and when not running this code is started. Obviously this does not work stable.

The differences between using gpioserver and scratchClient have been clearly visible in this workshop:
gpioserver does not complain about misspelled commands, and there is no monitoring capability for this tool. So when something is wrong, it is difficult to find the problem.
scratchClient needs an additional tool to be started, and multiple startups have been a problem. But the monitoring features with the web tool  localhost:8080 have been acknowledged as valuable in training environments.