Category Archives: tools

Auf die Plätze, fertig, los !

Mit einem toolgestützten Controller Framework für scratch3-Spiele soll die Entwicklung von Spielen mit scratch vereinfacht werden.

Die Ablaufsteuerung eines Scratch-Spieles mit verschiedenen Spielleveln macht Schülern der siebten Klasse einige Probleme:

  • Das Spiel kann einmal gespielt werden, beim zweiten Durchlauf erscheinen die Figuren an unerwarteten Stellen.
  • Um Fehler zu suchen muß das Spiel jedesmal vom Anfang an gespielt werden; einzelne Spiellevel können nicht separat angesteuert werden.
  • Das Einfügen neuer Level ist sehr aufwendig.
  • Hilfe für die Schüler bei Problemen ist schwierig wenn sich ein Programm zu einem verknäulten Spaghetti entwickelt hat.

Bisher wurde ein Controller Framework vorgestellt und die Implementierung auch angeleitet. Die Implementierung war jedoch teilweise papierbasiert und diese Vorgehensweise insgesamt nicht sehr erfolgreich.

Die Arbeitsschritte waren:

  • Erklärungen der Motivation, Vorgehensweise an der Tafel
  • Checklisten verteilen
  • die Abfolge der Spiellevel und der Ereignisse in einem Diagramm aufzeichnen
  • Anhand einer Beschreibung/ Checkliste dann die Scripte für den Controller aufbauen

Diese manuelle Vorgehensweise war nicht sehr erfolgreich. Der Nutzen für die Entwicklung war nicht sofort ersichtlich und statt endlich mit dem Spiel loszulegen wollte niemand gerne erst mal auf Papier irgendwelche Bilder zeichnen.

  • die auf Papier erstellten Diagramme wurden nicht an die aktuellen Programm angepasst und konnten so zum Verständnis des Spieles nicht herangezogen werden. Oder waren dann nicht mehr greifbar, vergessen, nicht abgeheftet.
  • Die Diagramme wurden im ersten Anlauf ‘zu schön’ gezeichnet mit Karopapier und Lineal. Dieser für erste Versionen überflüssige Aufwand benötigt viel Zeit und schöne Diagramme werden weniger bereitwillig geändert.
  • die Diagramme mussten manuell in Skripte und Ereignisse übertragen werden, hier gab es Tippfehler, Abweichungen bei groß-Kleinschreibung, Auslassungen.
  • Individuelle Abwandlungen der Controller-Skripte führen zu einem hohen Aufwand bei der Unterstützung der Schüler.

Mit einem toolunterstützten ‘Controller-Framework’ sollen diese Probleme vermieden werden. Insbesondere muß der Planungsschritt “Ablaufplanung” schnell und unkompliziert durchgeführt werden können.

Für Schüler wird das Framework altersgemäß als Rezeptsammlung bereitgestellt. Nach einer Einführung soll es im Prinzip möglich sein durch einfache Übernahme der generierten Skripte sehr schnell einen Fortschritt zu erzielen. Was dann – hoffentlich – die Motivation steigert das Framework zu benutzen.

Das Framework soll die folgenden Features aufweisen:

  • Einzelne Level können separat gestartet werden während der Entwicklung und Test.
    Das Durchlaufen komplexer Abläufe bis zu einem bestimmten Fehler wird vermieden.
  • Supportaufwand wird durch Standardisierung verringert.
  • Die Ereignisse wie ‘gewonnen’, ‘verloren’ können simuliert werden und erlauben das einfache Verifizieren der Spielabläufe.
  • Eine Erweiterung des Spieles um zusätzliche Level ist einfach möglich.
  • Der Controller, ein Sprite mit dem Namen ‘Dirigent’, gibt Meldungen aus wenn ein neuer Level gestartet wird. Protokollierung kann ggf. einfach nachgerüstet werden.

Mit der Umstellung des Kurses von scratch1.4 zu scratch3 in 2022 wird eine technische Unterstützung mit einem grafischen Tool eingeführt. Die Schüler müssen zwar im Moment weiterhin die generierten Skripte abtippen, aber durch die genaue Abbildung wird ein besseres Ergebnis erwartet.
Eine automatische Erstellung eines importfähigen Sprite ist noch nicht umgesetzt.

Der Post ist eine Überarbeitung eines früheren Artikels über die Ablaufsteuerung: Auf die Plätze, fertig, los !

Bestandteile des Framework

Das Framework implementiert eine Controller Pattern bestehend aus einer Zustandmaschine für die Abläufe und Interfaces/ Templates für Ereignisse im Spielablauf.

Ein zentrale Controller Komponente implementiert als scratch Sprite ist nur für den übergeordneten Spielablauf zuständig.

Alle Sprite erhalten standardisierte Ereignisse für die Ablaufsteuerung.

UML Diagramm für die Messages zwischen Dirigent und einem Sprite für einen Level ‘Level_1’

Die Ablaufdiagramme sind grafisch vereinfachte UML StateMachineDiagram.

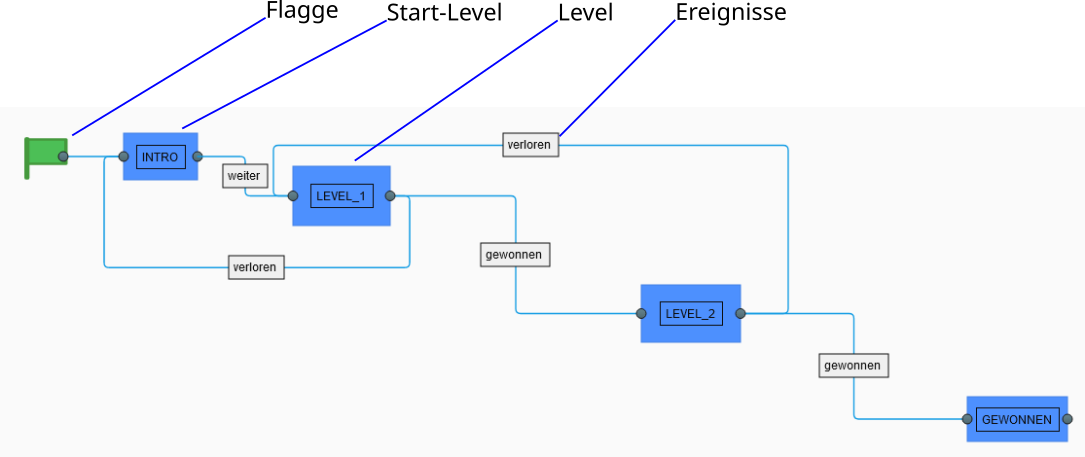
Die Zustände haben links die ‘Entry’-Port, rechts die ‘Exit’-Port so dass die Pfeile an den Events entfallen können.

Entry-Aktionen werden in zwei Phasen ‘fertig’ und ‘los’ aufgeteilt und über Messages, scratch-Ereignisse angesteuert.

Werkzeuge, Toolunterstützung

Das Tool besteht aus einem grafischen Editor für Spielabläufe und der Möglichkeit daraus den Sprite-Skript-Code zu generieren sowie die Templates für die Ereignisse der Sprite-Spielfiguren.

Es wurde wenig Aufwand in eine ‘smarte’ Oberfläche investiert:

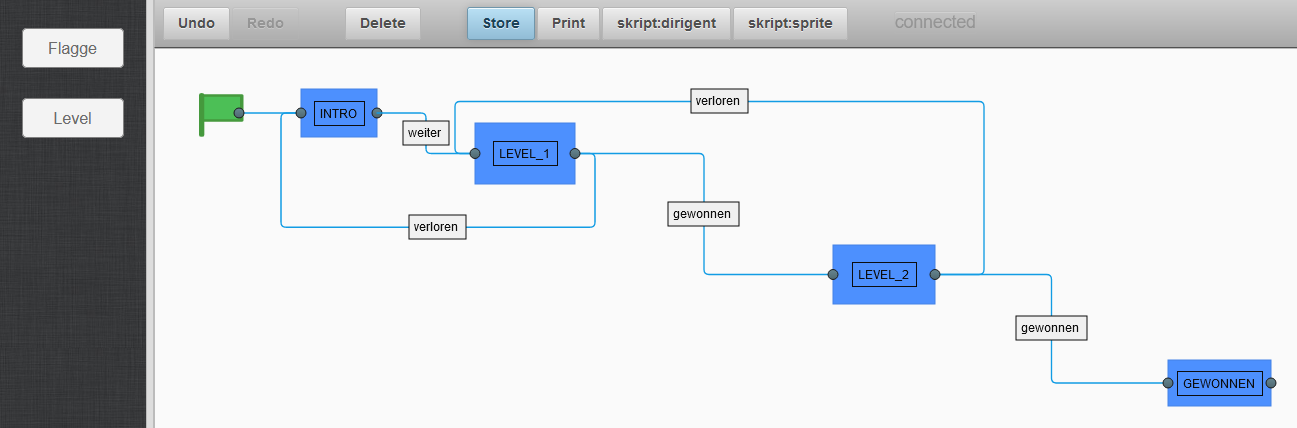
Bedienoberfläche des Editor.

Technisch gesehen läuft das Tool im Browser, es wird eine javascript-Bibliothek draw-2d verwendet.
Aus einer einfachen Palette werden die Elemente auf die Arbeitsfläche gezogen. Die Verbindungen werden mit der Maus erstellt.

Undo, Redo werden unterstützt. Alle Veränderungen werden in einer lokalen Datenbank persistiert. Mit “Store” werden Ergebisse gespeichert und die bis dahin angefallen Zwischenstände dann gelöscht.

‘Print’ speichert die Grafik als svg-Datei auf dem Rechner. “skript:dirigent” und “skript:sprite” aktivieren den Generator und die grafische Ausgabe der Skripte. Bisher muß dann manuell abgetippt werden. Für das gezeigte Beispiel sind das im ‘Dirigent’ etwa 50 Blöcke.

Die Server-Komponente ist in python mit ‘tornado’ implementiert, ‘sqlite3’ übernimmt die lokale Speicherung.
Die Generierung der Grafiken erzeugt SVG in Webseiten, hier ein Beispiel für die Ausgabe des “skript:dirigent”:

Anzeige des generierten Dirigent-scratch-Skript

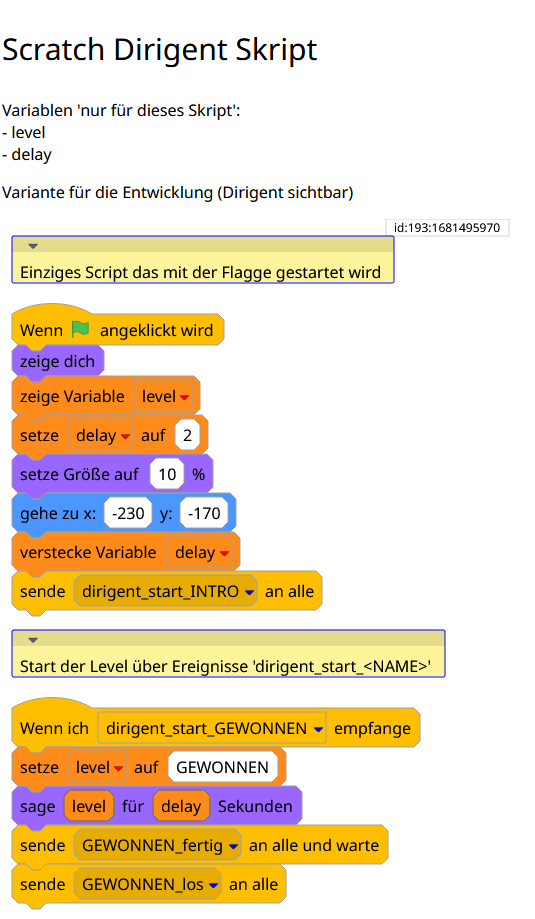
Die Anzeige der Skripte lehnt sich an die aus scratch3 bekannten Formen und Farben an; die schwarze Schrift ist eine Abweichung von der Pastelloptik und besser lesbar.

Das Controller-Framework hat als zentrale Komponente ein scratch-Sprite mit dem Namen ‘Dirigent’. Das ist der ‘Controller’ des Spiels.
Technisch gesehen implementiert der Controller einen Zustandsautomaten, die Level sind die Zustände und die Übergänge werden über Ereignisse gesteuert. GesStartet über die grüne Flagge.

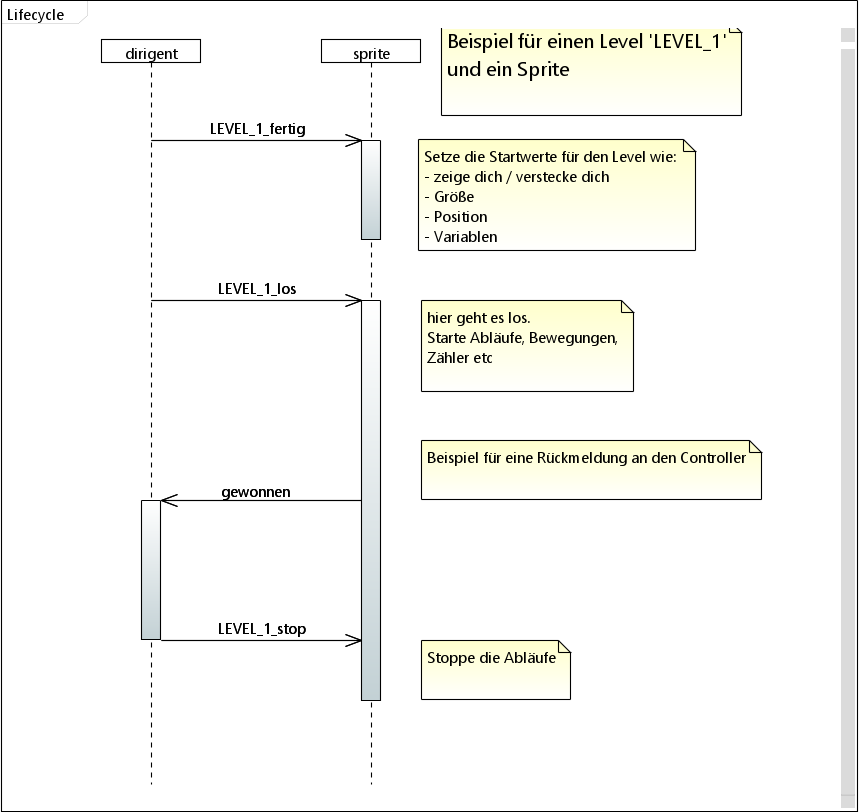
Die einzelnen Sprites in Scratch (Spielfiguren) erhalten eine standardisierte Schnittstelle aus Ereignissen (Messages).

LEVEL_1_fertig: Dirigent zu Sprites. Setze die Startwerte für den Level wie:
– zeige dich / verstecke dich
– Größe
– Position
– Variablen

LEVEL_1_los: Dirigent zu Sprites. Hier geht es los. Die Abläufe werden gestarten, Bewegungen aktiviert etc.

LEVEL_1_stop: Dirigent zu Sprite. Der level ist beendet, beende Aktionen des Sprite. Stoppe Schleifen.

gewonnen, verloren, weiter o.ä.: Sprite zu Dirigent. Damit wird der Übergang zu einem neuen Level gestartet. Hier können die Schüler (fast) beliebige Namen verwenden.

In den Beispielen werden die Level in Großbuchstaben geschrieben. Das erleichtert die Übersicht.

Aus dem Ablaufdiagramm erzeugte Scratch-Snippet für ein Sprite.

Die Schüler füllen – statt den Kommentaren – ihre eigenen Abläufe ein.

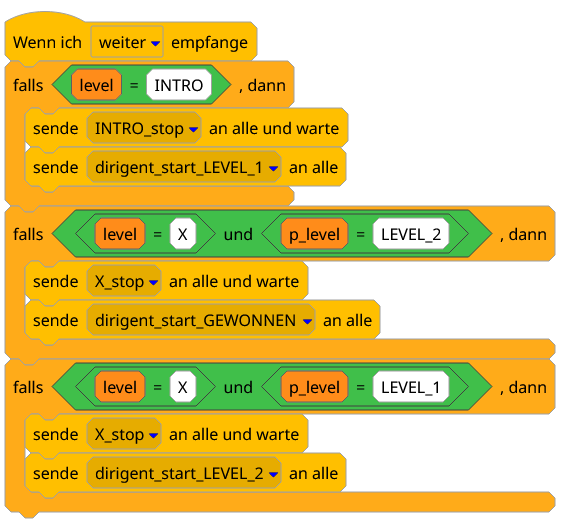
Spezialfall ‘wiederverwendbarer Level’

In den von Schülern gezeichneten Ablaufdiagrammen tauchen regelmässig Level auf, die wie ein Unterprogramm an verschiedenen Stellen verwendet wurden. Beispiele sind ein Zwischenlevel ‘der level wurde gewonnen, weiter mit dem nächsten Level oder beenden ?’

Bisher mussten solche Anforderungen durch spezifische (unique) Level gelöst werden oder die Programmierung wurde ad hoc ergänzt.

Das Tooling unterstützt diesen Sonderfall.

Komplexes Beispiel mit Zwischenlevel ‘X’

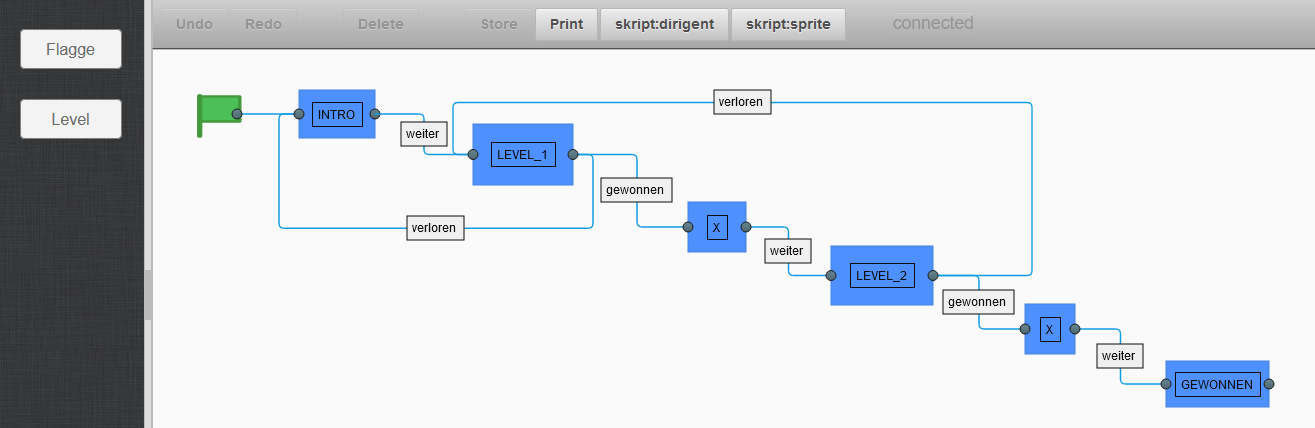
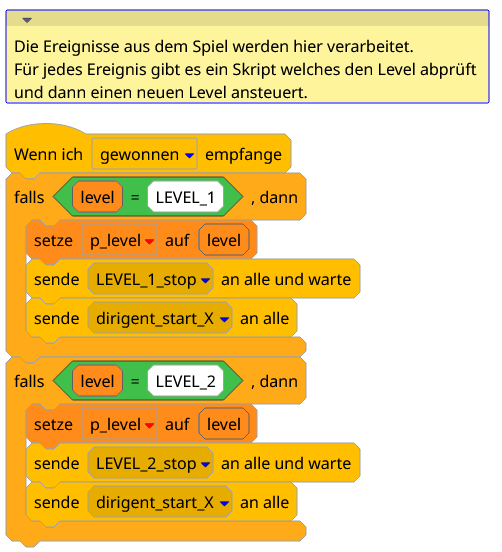
Die Skripte des ‘Dirigent’ sind sehr ähnlich wie des einfachen Beispiels, lediglich an den Stellen wo die Zwischenlevel eingefügt sind wird eine weitere Variable ‘p_level’ verwendet.

Sprite ‘Dirigent’, Beispiele für das Verarbeiten von Ereignissen mit ‘ZwischenLevel’.

Preparing Raspbian Images on Headless System

Annual school preparation needs to prepare some SD card with most current software, the current tutorials and some specific setup for scratchClient software.

There is standard answer you get when asking for the best procedure doing this: clone images using linux ‘dd’ tool.

Unfortunately this does not work when there are a SD cards which differ in size. And nevertheless it is needed to have a reference setup somewhere on a (laptop)-computer which allows to copy the data at least to one of the cards. So I decided to set up the SD card images using a headless PI and no manual operations on the target device.

This article shows some details about the scripting used.

Basic Procedure

The basic procedure is

  • prepare the data (tutorials, custom config, software) in a file system on a remote computer.
  • have sd cards with off-the-shelf raspbian prepared. WinDiskImager is used to prepare these. Which is a quick procedure, as these images are typically around 3GB in size.
  • Insert sd car into pi, power and start script.
  • Write some blog about scripting SD card setup.

Tooling

The automation of these tasks is performed in ‘ant’. SSH access and SCP are essential for controlling the remote raspberry.
Ant is available standalone. As I use ‘eclipse’ on a laptop for most of my programming tasks, ant is easily available.

The host computer controls a PI by ssh commands. This Pi is connected by network. The local DHCP-Server assigns fixed IP address to this Pi. One card after the other is inserted into the SD slot, Pi gets power and the script is started on laptop.

Script desription

In the script, first step is to get root access from remote. In earlier releases of raspbian < mai 2016, it was possible to create root user and have root access through ssh. In current releases, the /etc/ssh/sshd_config does not allow root user access by password. The setting ‘PermitRootLogin’ does not allow this. The workaround is to use key based authentication. The keys need to be copied to the target system first.

<antcall target='passwd.root' />
 <antcall target='key.deploy.pi' />
 <antcall target='key.deploy.root' />

Creating the root user can be performed by standard pi user. A shell file is created locally, transferred to target and executed there.

    <target name="passwd.root">
        <echo file="passwd.sh">
            <![CDATA[passwd root <<EOF
${root.password}
${root.password}
EOF
]]>
        </echo>
        <scp_l2r_pi local="passwd.sh" remote="/home/pi/passwd.sh" />
        <delete file="passwd.root" />

        <ssh_exec_pwd_pi command="sudo sh passwd.sh" />
        <ssh_exec_pwd_pi command="rm passwd.sh" />
    </target>

The commands scp_l2r_pi (scp local 2 remote, user pi) and ssh_exec_pwd_pi (ssh exec, passwort authentication, user pi) are macro definitions which hide all the details .

    <macrodef name="scp_l2r_pi">
        <attribute name="local" default="NOT SET" />
        <attribute name="remote" default="NOT SET" />
        <sequential>
            <scp remoteTofile="${pi.user}:${pi.password}@${pi.host}:@{remote}" file="@{local}" failonerror="true" verbose="${verbose}" trust="yes" />
        </sequential>
    </macrodef>
    <macrodef name="ssh_exec_pwd_pi">
        <attribute name="command" default="NOT SET" />
        <attribute name="failonerror" default="true" />

        <sequential>
            <sshexec command="@{command}" failonerror="@{failonerror}" host="${pi.host}" username="${pi.user}" password="${pi.password}" trust="yes" />
        </sequential>
    </macrodef>

Similiar macros exist for key authentication, which is possible for root when ssh keys are available and root user is created.

The key distribution is done with password authentication and pi-user access only.

    <target name="key.deploy.pi">
        <ssh_exec_pwd_pi command="[ -d /home/pi/.ssh ] || mkdir /home/pi/.ssh" />
        <scp_l2r_pi remote="/home/pi/.ssh/authorized_keys" local="key/id_rsa.pi.pub" />
    </target>

    <target name="key.deploy.root">
        <scp_l2r_pi remote="/home/pi/authorized_keys" local="key/id_rsa.root.pub"  />
        <ssh_exec_pwd_pi command="echo '${root.password}' | sudo -S mkdir /root/.ssh" failonerror="false" />
        <ssh_exec_pwd_pi command="echo '${root.password}' | sudo -S cp /home/pi/authorized_keys /root/.ssh/authorized_keys" />
    </target>

The root file deployment is done into a pi-user file first. Then with copy commands, the transfer into the target dir is performed. Here ‘sudo’ is needed.

raspi-config non interactive

The tool ‘raspi-config’ assembles all the knowledge about the config files and settings needed to tweak the system. Since some time > mai 2016, there is a command line switch allowing to use the tool from command line. There is no documentation, but the programming is straightforward. Here the code to set serial (off) and to spi (on).

    <target name='set_serial' description="disable serial">
        <echo>set Serial off</echo>
        <ssh_exec_key_root command="raspi-config nonint do_serial 1" />
    </target>

    <target name='set_spi'>
        <echo>set SPI on</echo>
        <ssh_exec_key_root command="raspi-config nonint do_spi 0" />
    </target>

The parameters ‘0’ and ‘1’ are opposite to their human meaning, but these values are found inside the script. So ‘do_serial 1’ switches serial line off.

    <target name='set_overclock_high'>
        <!-- High is both available on pi 2 and pi 3 -->
        <ssh_exec_key_root command="raspi-config nonint do_overclock High" />
    </target>

For completeness also the scripting for the overclock setting.

Update system software

One of the basic steps is the update of the system.

        <sequential>
            <echo>Packages aktualisieren</echo>
            <ssh_exec_key_root command="apt-get update" />
            <ssh_exec_key_root command="apt-get upgrade -y" />
        </sequential>

Transfer of data, code, config

Finally, the transfer of the tutorials, software and all the other things is done. Compared to the overhead needed a quite short task.

            <sequential>
                <echo>copy tutorials and other</echo>

                <scp failonerror="true" verbose="${verbose}" todir="${root.user}@${pi.host}:/home/pi" keyfile="${basedir}/key/id_rsa.root" trust="yes">
                    <fileset dir='data'>
                        <include name='**/*' />
                    </fileset>
                </scp>
                <ssh_exec_key_root command="chgrp -R pi /home/pi/" />
                <ssh_exec_key_root command="chown -R pi /home/pi/" />
            </sequential>


Time measurements

The execution time of the script is dependent on the amount of packages downloaded from the web into the computer. For this setup, the raspbian distribution is from mai 2016 and the setup time was sept 2016, so quite a lot of packages needs to be updated.

target system overclock SD card time
PI 2 no 6MB/s 41 min
PI 2 fast 6MB/s 38 min
PI 3 fast 6MB/s 24 min
PI 3 fast 16MB/s 15 min

tldr

With automation by ‘ant’, SD cards are set up using a headless pi installation and no manual interaction.


Deployment of code from eclipse to a Raspberry Pi

I usually write my code, either java, python or c++ in eclipse on a laptop or desktop computer. Eclipse is very comfortable, but unfortunately too large to run on these small target systems.
So I had the need to deploy the code to a remote system.

Deployment can be done manually, when a few files are transferred by a ftp tool.

But when complexity gets larger (omit some files, different target systems), or frequency of deployment is high (many per day), automation is needed.

Apache ‘ant’ is a scripting tool which allows to package, transfer and remotely deploy software.
Ant from ant.apache.org is a build system based on a xml syntax, which aims to run on almost every operating system where java is available. It is widely used in professional software development in industry.
Eclipse comes with ant preconfigured, at least if you download the java edition and then add the c or python or whatever plugins.

In all my projects, an ant build file ‘build.xml’ is in the project root. There I provide targets for version control, backup and deployment. See here a snippet from the build.xml for my scratchClient. The detail is about deployment here.

<project name='scratchClient' default='distribute'>
   <!-- build.properties provides connections and passwords -->
   <property file='../build/build.properties' />

   <!-- filesets define 'what' to transfer -->
   <fileset dir='../' id="tar.fileset">
      <include name='scratchClient/**/*' />

      <!-- in some configurations, there are phone numbers, pin or alike, exclude from deployment */
      <exclude name='scratchClient/**/private/**/*' />

      <exclude name='scratchClient/build.xml' />
      <exclude name='scratchClient/build.properties.template' />
      <exclude name='scratchClient/*pid' />
      <exclude name='scratchClient/**/*pyc' />
      <exclude name='scratchClient/build.properties' />
      <exclude name='scratchClient/download/**/*' />
      <exclude name='scratchClient/temp/**/*' />
      <exclude name='scratchClient/.settings/**/*' />
      <exclude name='scratchClient/.project' />
      <exclude name='scratchClient/.pydevproject' />
   </fileset>

   <target name='deploy'>
      <echo>deploy to ${pi.host}</echo>
      <echo>from  ${basedir}</echo>
     
      <delete file="download/scratchClient.tar.gz" failonerror="no" />
      
      <tar destfile="download/scratchClient.tar.gz" compression="gzip" >
         <fileset refid="tar.fileset" />
      </tar>

      <echo>send app code  /home/pi/scratchClient  ${pi.user}@${pi.host}:/home/pi</echo>

      <scp file="download/scratchClient.tar.gz" password="${pi.password}" todir="${pi.user}@${pi.host}:/home/pi" trust="true" />

      <sshexec command="rm -R /home/pi/scratchClient/*" 
               host="${pi.host}" username="${pi.user}" password="${pi.password}" 
               trust="true" failonerror="false" />
      <sshexec command="tar zxvf scratchClient.tar.gz" 
               host="${pi.host}" username="${pi.user}" password="${pi.password}" 
               trust="true" failonerror="true" />
   </target>

The script packages the code in a temp folder (not adding some common stuff). Then it sends (scp) it to the target machine, wipes the target folder (sshexec) and unpacks the data there. sshexec is connecting to the remote computer and executing commands there.

In eclipse, this script is activated by a rightclick in an outline view, but can also be activated on a eclipse build procedure.

The host names, passwords for the target environment is in another build script build/build.properties
One reason is that these are common for many projects, the other is that these are outside the usual scope and when copying a bunch of data and sending them away these security related things will not be included.
This file looks like:

#Sun, 17 Mar 2013 08:33:21 +0100
pi.host=192.168.2.105
pi.user=pi
pi.password=NNNNNNNNNNNNNNN
root.user=root
root.password=NNNNNNNNNNNNNNN

This is a complex setup, but reliable and I have full control on what happens.

Except for a ssh-access on the raspberry pi, there is no extra deployment software needed.