Category Archives: gpio

howto: Edit scratchClient Config Files

There was a question on how to edit scratchClient config files. There was the need to add a Button to a GPIO. Button inputs are handled by a GPIOEventInput-Adapter.

This short walkthrough will not explain all the details but will concentrate on

  • where to find the files
  • use an editor
  • copy / paste an adapter
  • adjust relevant sections
  • save
  • and run it.

Where to find the files

Configuration files for scratch usually are in directory /home/pi/scratchClient/config/ . The ‘/’ at the end is used to mark a path as a directory.

Use an Editor

Config files are XML-Files, eXtensible Markup Language with the ending ‘.xml’. There are special editors for these files, but as xml is plain text a text editor can be used to edit.
For almost each adapter type there is a sample in these files. We start to edit the marked file config_ikg_button_intern.xml as it already contains a GpioEventInputAdapter which will be modified. Right-click on the file and select ‘open with – Text Editor’.

When the file is open, there are sections visible in brackets. Adapter definitions start with <adapter> and end with the next </adapter>. There can be multiple of these sections in one config files which are activa6ted by scratchClient at a time.

The adapter is light grey marked in the above screenshot. The colors are different between various editors.

Copy / Paste an Adapter

Copy this adapter and paste behind an existing adapter, behind the </adapter>-element. The sequence in the file is not important. You will notice that the sequence is used for the display in the adapter view in the browser. But technically all adapters work the same independent from their position in the file.

Adjust relevant sections

The config file provides the data for scratchClient hoq the adapter shall work. Some of the information needs to be unique, other information is needed to have meaningful names in scratch.

  • Adapter-Name: give the adapter an unique name. Best is to use a name which is close to its use in the system, e.g. ‘button_22’ or better ‘button_motor_left’. The ikg_config files are quite generic and therefor have most times just numbers. As you will use these files for a project, choose more meaningful names.
  • GPIO-Pin: A GPIO pin is only allowed once in a file. Select a free GPIO pin. The numbering scheme is BCM-numbers. Do not choose GPIO used for SPI, I2C or the Hat-eeprom. These names are case sensitive.
  • Scratch-Name: an event-adapter has two event outputs for button_pressed and button_released. These need to be mapped to the names used in scratch. Use a meaningful name like ‘button_motor_left_pressed’ and ‘button_motor_left_released’.
  • The GPIO settings are ‘inverse =true’ for a button which is connected between GPIO and ground. Leave as it is. The poll.interval is 50 ms which is fast enough for even fast games.

Save the file

Save the file in a different location. Choose directory /home/pi/scratchClient/configuser/ which is dedicated for user files.
Files in userfiles are searched first at scratchClient startup. And will never be overwritten on updates.
Give the file a name which is releted to the project, e.g. config_project.xml. The extension ‘.xml is needed.

Run the file

Start scratchClient.

cd ~/scratchClient
python3 src/scratchClient.py -c userconfig/config_project.xml

The command line in scratchClient allows some flexibility to lookup the config files. The -c option allows to omit the extension and the prefix ‘config_’. The lookup procedure first looks in ./userconfig/’, if not found in ‘./config/’. The following command line is performing the same file lookup as above.

cd ~/scratchClient
python3 src/scratchClient.py -c project

Check the scratchClient browser adapter view localhost:8080.

The name button_motor is visible. The quite long scratch names are truncated, but this only in the view.

Editing a .xml file can be a challenge. If there are problems, scratchClient will reject to load the file and give error messages in the console.

scratch2 connected to scratchClient

Did you ever want to control GPIO from scratch2 ? Or other sensors connected to a raspberry pi ?

The last days I worked on connecting scratch2 with GPIO on raspberry and more.
To be precise, this is done by either using scratchx or since june 2017 with the standalone version of scratch2 for raspbian.

  • use scratch2 version named scratchX which supports ‘scratch extensions’. This version is identical to scratch2 with few limitations. Or use the standalone version on raspberry.
  • extending scratchClient to talk with scratch2 and providing sensor values and events, but also receive values from scratch2 and events.
  • scratchClient using adapters to connect peripheral devices as usual. For example to GPIO.
  • The blocks in scratchX are defined from the information available in the config file used by scratchClient.

This new version of scratchClient is still supporting scratch1.4 and there are no changes in the config files needed.

One of the limitations in scratchX are that sharing projects is not possible.

The extension blocks in scratchX are defined using the definitions from the config xml file from scratchClient. So there is no programming effort needed to build the extension file.

Current implementation allows to send/receive values and events from scratchX to/from scratchClient. This is similiar to the features available in scratch1.4 with the broadcast system.

Problems, Inconsistencies with scratch 1.4 broadcast system

In legacy 1.4 scratch, there are some predefined blocks for motors and sensor names for scratchBoard. This needed many explanations for unexperienced users to avoid confusion.

scratch 1.4 motor blocks in sensing palette

scratch 1.4 default sensor names

It was also difficult to explain that values from scratchClient are received as sensor values, but values to be sent out need to be defined as variables ‘for all sprites’.

In addition to this, the extra step ‘enable remote sensor connections’ is hidden down in a context menu of a block on lower edge of the window.

Advantages of the scratch2, scratchX block based interfacing

In scratchX, all the capabilities of the external system are exposed as blocks. This avoids all the mentioned problems from legacy scratch 1.4.

Modifications in scratchClient

scratchClient in its initial design is scratch1.4 centric. The start and stop logic is scratch 1.4 oriented and needed another structure.

During this work, the internal web app was lifted to use tornado framework. Which has build in websocket support and is easier to use as cherrypy. As scratchX is online only, the connection to a local data provider needs to bypass the ‘same server policy’ and this was quite simple to achieve with tornado.
Monitoring and simulation of events is still possible by using the internal web server. Some bugs have been removed in the web pages on this way.

Setup procedure

As the experimantal scratchClient is merged into scratchclient, the installation is same as for scratchClient.

Start scratchClient with the configuration xml file for your hardware. I recommend using python3 to run scratchClient. Unicode support is the reason for this.

Context

scratch2 / scratchX does not need to run on same computer as scratchClient. The communication beween scratchX and scratchClient uses websocket and http requests. In my test environment, scratchX runs on windows and scratchClient either on a raspberry or on windows.

Start scratchX

Load http://scratchx.org/#scratch into the browser.

Load extension loader

In ‘more blocks’, ‘Load Experimental Extension’,

press on Load Experimental Extensions and open Extension URL

Paste the following url into the form

https://megjlow.github.io/extensionloader.js

This url brings the Load Extension Block into the additional block palette.

Connect to scratchClient

The Load Extension Block is now used to load the scratchClient configuration. Best practice is to prepare a small script in stage which loads the scratchClient config.

Add a wait block before the ‘broadcast [blueFlag]’ with 5 seconds. This gives the extension the needed time to load and to initialize.

The program should use ‘blueFlag’ in all places where the green flag hat  is usually used.

The url to use to load the scratchClient extension is

http://localhost:8080/scratchx/js/extension.js

Copy paste this url into the ‘load extension block’. If scratchClient is running on a different computer, change ‘localhost’ to either the other computer’s IP-address which is something like 192.168.2.203 or perhaps a more meaningful name if the network configuration allows.

Validation

See the ‘green’ dots to the right of the extension name. If these turn red, connection is lost. Possibly scratchClient has been stopped, can’t be reached or other problems. In my tests the connection was stable.

Extra step for the preview: start legacy scratch and open remote sensor connection.

Loading a project using scratchClient extension

A program loaded from file system shows the Load Extension Block, but not the scratchClient extension. The blocks from the scratchClient extension are displayed as red blocks.

When program is started with green flag and the proposed initial script is executed, the Load Extension Block reads the extension from scratchClient and the program can be used.

Start scratch2 on raspbian

In raspbian jessie june-2017, there is a standalone scratch2 version available.

Start from programming/scratch2.

Press shift key and the file menu. The file menu now displays more options.

Select import experimental extension.

Paste the url into the dialog: http://localhost:8080/scratchx/js/extension.js

Validate in ‘more blocks’. The example here is for a test adapter and looks different for your configuration file.

This scratchClient version is released

There are no known limitations for this release.
Just start scratchClient and use either scratch1.4 (enable remote sensor connections) or follow the procedure to set up a scratch2/ scratchX connection.

Some features have been removed. Command line switches to control the gui are removed. As the web app server is needed to connect to scratchX, this does not allow to disable the web browser.

Example: Controlling two wheel robot pi2go with scratch2

The tests for the scratchX integration have been performed with a new pi2go-configuration. This includes GPIO, PWM, hardware PWM and ADC chips.

The monitoring/simulation web page display the many inputs and outputs available for this robot.

Not all adapters fit on the page.

The blocks build from this config in scratchX are (not all blocks shown).

On stage, there are the lights reporters and distance reporter visible.


Raspberry Pi GPIO to web page

In the Rasperry Pi forum, there are quite often questions on how to get a GPIO pin status displayed on a web page.

Common attempts are with CGI scripts; webiopi or other frameworks are proposed. CGI is quite outdated; and complex frameworks handle many technologies under the hood and leave few opportunities to learn.

I usually propose an architecture based on a python web application server, using websockets to send events to the browser. The browser uses javascript to display the data. Collection of GPIO events is done in a thread and data are sent through a queue to the python web application server. This architecture can be tested step by step and can be adjusted to different needs.

An overall sketch of the modules shows the connection between the components.

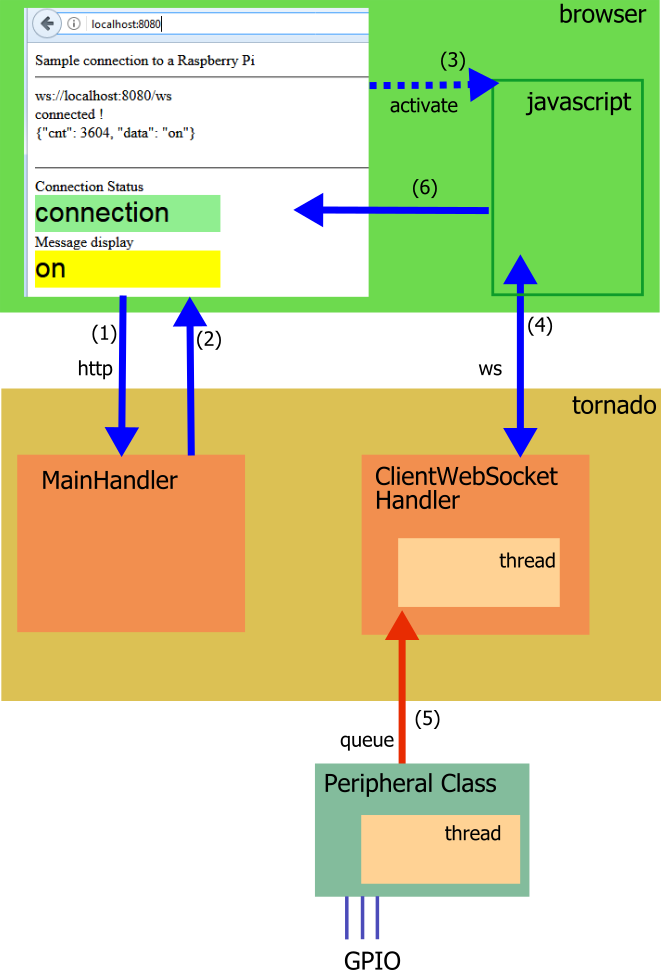
Basic sequence is: (1) Browser requests web page from server, (2) server provides web page and (3) javascript in browser is activated. (4) Javascript opens a websocket to the server. In the server, there are handler for the http request and web socket. The peripheral access is handled in a separate class and (5) sends data through a queue to the web socket handler. (6) in browser, javascript sets the received data into the html-document.

(1) Browser requests web page. The python web application server is responsible to handle this.

(2) To provide the page, the ‘tornado’ package is used. All these web app servers consist of Handler classes for various purpose. The tornado  framework uses a mapping from web request pathes to the Handlers.

def make_app():
    return tornado.web.Application(
                 [
                     (r"/"  , MainHandler),
                     (r"/ws", ClientWebSocketHandler),
                 ]
                )

The ‘root’ path for a web page is ‘/’. This is the  path a browser requests when http://heppg.de is requested. The http requests have various types, the usual request for a page is a ‘get’ request. The tornado routes this request to the MainHandler, and as it is a get request the method called is the ‘get()’-method.

To tell the whole story, the app server is initialized with

if __name__ == "__main__":
    print("start")
    app = make_app()
    app.listen(8080)
    try:
        tornado.ioloop.IOLoop.current().start()
    except KeyboardInterrupt:
        peripheral.stop()
        runMessageSend = False
        tornado.ioloop.IOLoop.current().stop()
    print("stopped")

In this code, there is also the port 8080 in the listen-statement. The url for a browser is

http://localhost:8080

or

http://127.0.0.1:8080

There is extensive documentation on the tornado web site ‘.tornadoweb’.

A basic implementation for the MainHandler is

class MainHandler(tornado.web.RequestHandler):
    def get(self):
        self.write( "hello world" )

Instead of the simple ‘hello world’ a web page is produced. Html pages are xml structures, containing <head> and <body>-Elements.

class MainHandler(tornado.web.RequestHandler):
    def get(self):
        self.write( """<html>
    <head>
        <title>Websocket sample</title>
    </head>
    <body>
        Sample connection to a Raspberry Pi
    </body>
</html>"""

The quotation with the three quotes allows to use multiline content, which makes editing simpler.

So far the page contains only the basic elements. As we later need some boxes to add text, these are defined with labels.

"""<html>
    <head>
        <title>Websocket sample</title>
    </head>
    <body>
        Sample connection to a Raspberry Pi
        <hr/>
        <div>
           <div  style="position:relative; width:400px; height:80px;" >
               <div id="addr" style="width:400px; height:20px;">    addr    </div>
               <div id="status" style="width:400px; height:20px;">  status  </div>
               <div id="msg" style="width:400px; height:20px;">     message </div>
           </div>
        </div>

        <hr/>

        Connection Status
        <div id="connection" style="position:relative; width:200px; height:40px;background:lightgrey; font: 30px arial, sans-serif;" >
            connection
        </div>
        Message display
        <div id="feld" style="position:relative; width:200px; height:40px;background:lightgrey; font: 30px arial, sans-serif;" >
            message
        </div> ..."""

(3) The javascript part plays its role now. With javascript, websockets can be opened and data can be send to the server or received from the server.

(4) To open a socket, the address needs to be build from the servers address. As the web page is received from the server, this is already known inside the browser context. Instead of http:// as the protocol, the protocol used is ws://. For a local connection, this results in “ws://localhost:8080/ws”. The trailing “/ws” is needed for the tornado routing which addresses this request to the WebSocketHandler.

var addr = "ws://" + window.location.hostname + ":" + window.location.port + "/ws";
var websocket = new WebSocket( addr );

Javascript uses ‘callback’ methods on websocket events.

    websocket.onmessage = function(e){
        ...
    }
   
    websocket.onopen = function(){
       console.log('Connection open!');
       ...
    }
   
    websocket.onclose = function(){
       console.log('Connection closed');
       ...
    }

The content is abbreviated … for clarity. The console.log(‘hello’); is a convenient way to debug javascript in a browser. If firefox is used, the debugger is available inside the browser. In earlier releases there was usually ‘firebug’ used, an extension to firefox. In newer releases – here I use 53.3 – firebug is no longer supported and “Firefox DevTools” instead. These are activated with a right click in the page and ‘inspect element’.

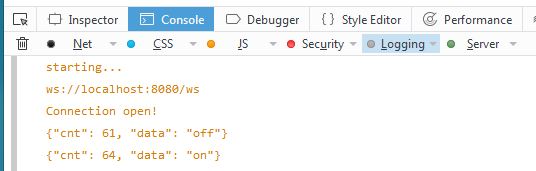
Really useful for finding out what the system is doing. Of course the debugger is also sometimes needed.

When the connection is opened, the callback function sets the status color.

    websocket.onopen = function(){
       console.log('Connection open!');
       document.getElementById("connection").style.background = 'lightgreen';
       document.getElementById("status").innerHTML = 'connected !';
    }

The elements retrieved from the html document are the named ‘div’ sections ‘connection’ and ‘status’.

Next important step is inside the python app server. When socket is opened, an instance of ClientWebSocketHandler is created. In the current application, the class starts a thread which shuffles data from a queue into the send method. So whenever a message is on the queue, this message is sent to the browser.

# a variable to gracefully stop the threadsrunMessageSend = True       

class ClientWebSocketHandler(tornado.websocket.WebSocketHandler):
    def __init__(self, args, kwargs):
        tornado.websocket.WebSocketHandler.__init__(self, args, kwargs)
        print("ClientWebSocketHandler.init")
       
        self.my_thread = threading.Thread(target = self.run)
        self.my_thread.start()
       
    def run(self):
        while runMessageSend:
            try:
                # something on the queue ?
                s = sendQueue.get(block=True, timeout=0.1)
            except Exception:
                continue 
            # doublecheck if connection available
            if self.ws_connection is None:
                print("discard ", s) 
            else:
                print("send ", s) 
                try:
                    # and send toward the browser
                    self.write_message(s )
                except Exception:
                    pass

(5) The other side of the queue can be used as needed. As a sample, here just a debug-Sending class which sends ‘on’, ‘off’ packed in a json telegram.

# messages from Periphaeral Class to Websocket
sendQueue= Queue.Queue()

class PeripheralDebug:
    """Debug class"""
    def __init__(self, sendQueue):
        self.sendQueue = sendQueue
       
    def start(self):
        self.runit = True
        blinkThread = threading.Thread(target=self.blink)
        blinkThread.start()
 
    def stop(self):
        self.runit = False
               
    def blink(self):
        cnt = 0
        while self.runit:
            self.sendQueue.put( { 'data': 'on', 'cnt' : cnt } )
            cnt += 1
            time.sleep(0.5)
            self.sendQueue.put( { 'data': 'off', 'cnt' : cnt } )
            cnt += 1
            time.sleep(0.5)

The json telegrams “{ ‘data’: ‘on’, ‘cnt’ : cnt }” contain the ‘data’-element and a counter ‘cnt’. It is usually a good idea to pack a telegram counter into a telegram. This helps to find out whether messages are lost or a connection was broken for some time.

The queue is created with Queue.Queue(), which is typical for python 2; in python3 it is more consistent with queue.Queue().

The PeripheralDebug-Class is started with

peripheral = PeripheralDebug()
peripheral.start()

Instead of this debug-Class, a ‘real’ PeripheralGPIO class can be used. When the Telegram is the same, and the queue is same queue as before, this can be exchanged easily.

class PeripheralGPIO:
    """Connection to a GPIO pin"""
    def __init__(self, sendQueue):
        self.sendQueue = sendQueue
       
        GPIO.setmode(GPIO.BCM)
        GPIO.setwarnings(False)
       
        self.channel = 4
        GPIO.setup(self.channel, GPIO.IN, pull_up_down=GPIO.PUD_UP)

    def start(self):
        self.runit = True
        blinkThread = threading.Thread(target=self.run)
        blinkThread.start()

    def stop(self):
        self.runit = False
       
    def run(self):
        cnt = 0
        prev = None
        while self.runit:
            res =  GPIO.input(self.channel)
            if prev != res:
                if res:
                    self.sendQueue.put( { 'data': 'on', 'cnt' : cnt } )
                else:
                    self.sendQueue.put( { 'data': 'off', 'cnt' : cnt } )
                cnt += 1
                prev = res
            # for debouncing and limiting number of events per time
            time.sleep(0.01)

In IT terminology, these two classes PeripheralGPIO and PeripheralDebug use the same interface. Unfortunately,  in python Interfaces are not very prominent. To make this ‘Factory Pattern’ complete, there is also a PeripheralFactory which returns either the debug-version or the GPIO-version of these classes.

class PeripheralFactory:
    @staticmethod
    def getPeripheral(debug):
        if debug:
            return PeripheralDebug(sendQueue)
        else:
            return PeripheralGPIO(sendQueue)
                   
peripheral = PeripheralFactory.getPeripheral(debug)
peripheral.start()

(6) Last step is to display the data from the websocket in the browser, so javascript gets this task:

    websocket.onmessage = function(e){
        var server_message = e.data;
        var obj = JSON.parse(server_message);
       
        document.getElementById("feld").innerHTML = obj.data;
        if ( obj.data == "on" )
        {
            document.getElementById("feld").style.background = 'yellow';
        }
        else
        {
            document.getElementById("feld").style.background = 'lightblue';
        }
        console.log(server_message);
        document.getElementById("msg").innerHTML = server_message;
    }

The message data are retrieved from the event-attribute data “e.data”. As this message is  json, this is parsed with JSON.parse(server_message); returning an object. The data part of the json dictionary is retrieved with obj.data and accordingly the status box is getting its color.

The complete code can be downloaded here.