Author Archives: ghp_Ar7p

scratch Art Project

Having some spare time in the scratch course at school, we did a short ‘computer art project’.

A short introduction to the topic was presented, some materials taken from the following web pages:
https://gigers.com/blog/computerkunst-mit-snap-wiederholung-und-zufall/
– https://monoskop.org/images/2/25/- Reichardt_Jasia_ed_Cybernetic_Serendipidity_The_Computer_and_the_Arts.pdf
http://joachim-wedekind.de/Downloads/AtlasComputerkunst_redsize.pdf

The task for the kids, 7th class, was to use simple geometrical patterns combined with some randomness.

Using scratchClient, a pen plotter axidraw SE/A3 was connected for the class room. A standard laptop was used for a plotter server, caching the kids graphics and spooling to the hardware.

Kids worked on RPi4 boards, scratch3 local and sccratchClient (for scratch3) as a backend.

Results

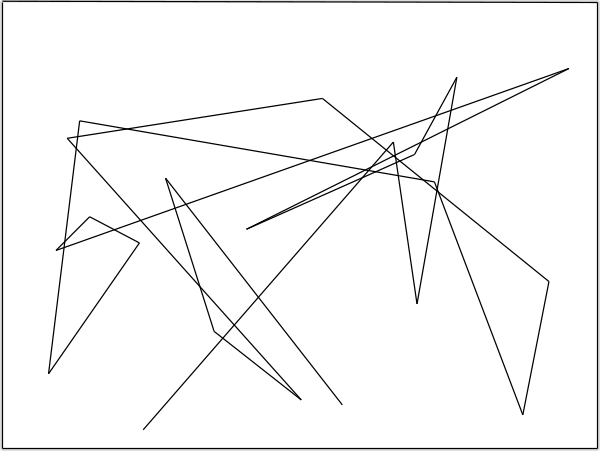
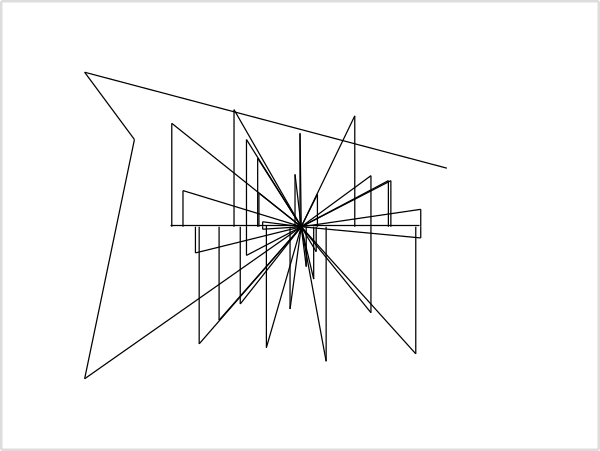
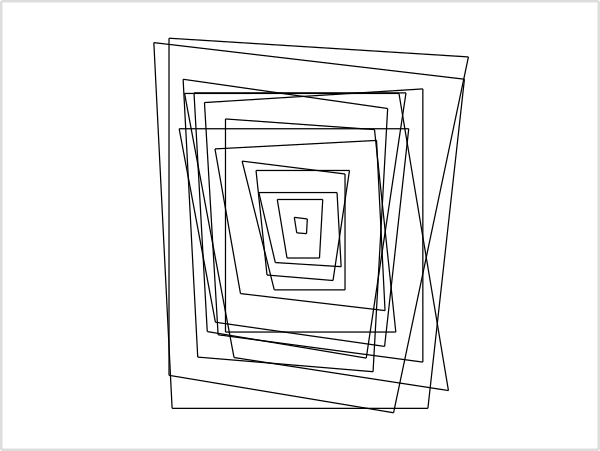
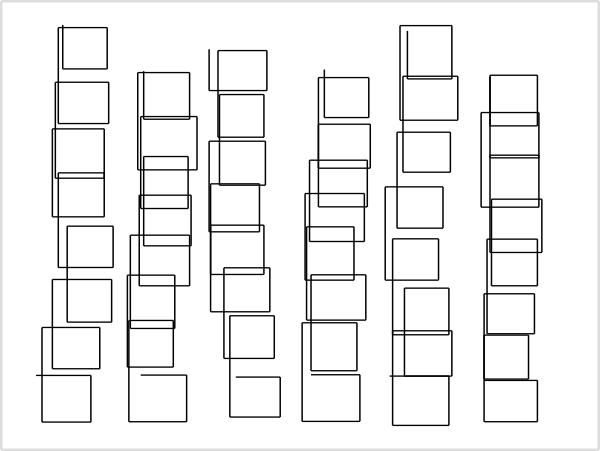
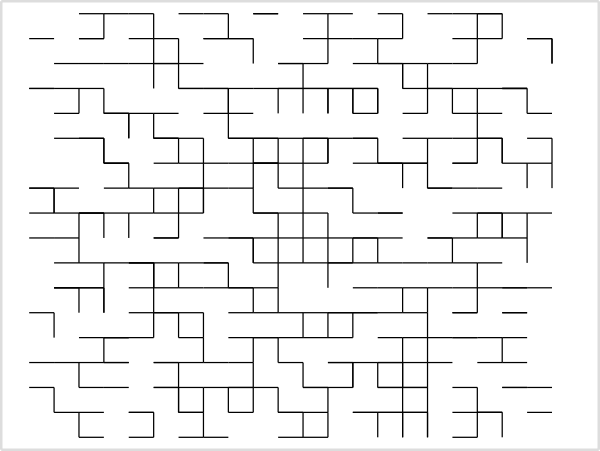
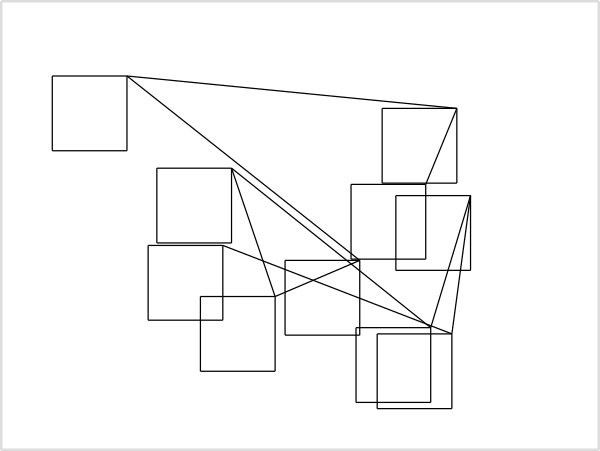
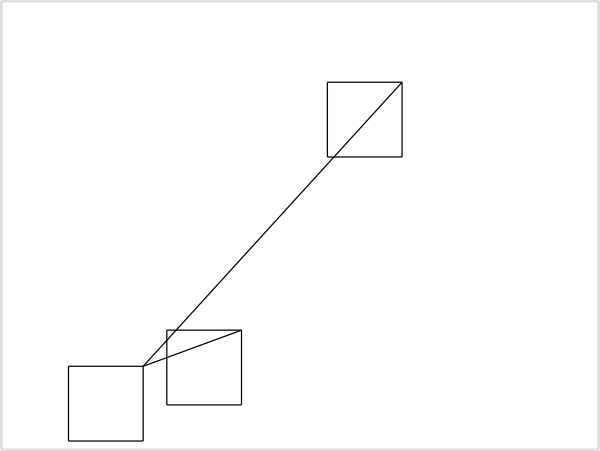
The kids hat a lot of fun working on this project. Within 90 minutes, there have been about 500 images produced (a lot of them just to see how ‘randomness works’), a total of about 420.000 graphical commands.

Some results produced have been plotted. The images presented here have been converted from the scratch graphical commands to svg images, then to pixel graphics.

The images are published with a copyright to the school.

copyright Immanuel Kant Gymnasium Leinfelden Echterdingen 2024

copyright Immanuel Kant Gymnasium Leinfelden Echterdingen 2024

copyright Immanuel Kant Gymnasium Leinfelden Echterdingen 2024

copyright Immanuel Kant Gymnasium Leinfelden Echterdingen 2024

copyright Immanuel Kant Gymnasium Leinfelden Echterdingen 2024

System Context

The system fortunately worked pretty good. The scratchClient for the plotter used UDP broadcast to find a plotter server on a laptop. ScratchClient then used a ‘plotter’ adapter so send commands to plotter server.
The plotter server software then caches the results of the eight groups in the course. For the hardware axidraw, the plotterServer scales the output and does some drawing optimizations like reducing redundant pen lift up, down operations.

For the scratch project, a sample project was provided which demonstrated the ‘how it works’. From this, the kids developed their own idea.

Basic plotter commands are

  • begin, end: The wrapper for the plotter Server to separate images
  • up, down: pen move commands
  • goto_x_y x=, y= : absolute move
  • change_x, x=: change x position
  • change_y, y=: change y position.

All commands updated local stage and simultaneously have been sent to plotter server.

Here a sample scratch snippets to draw some nested squares:

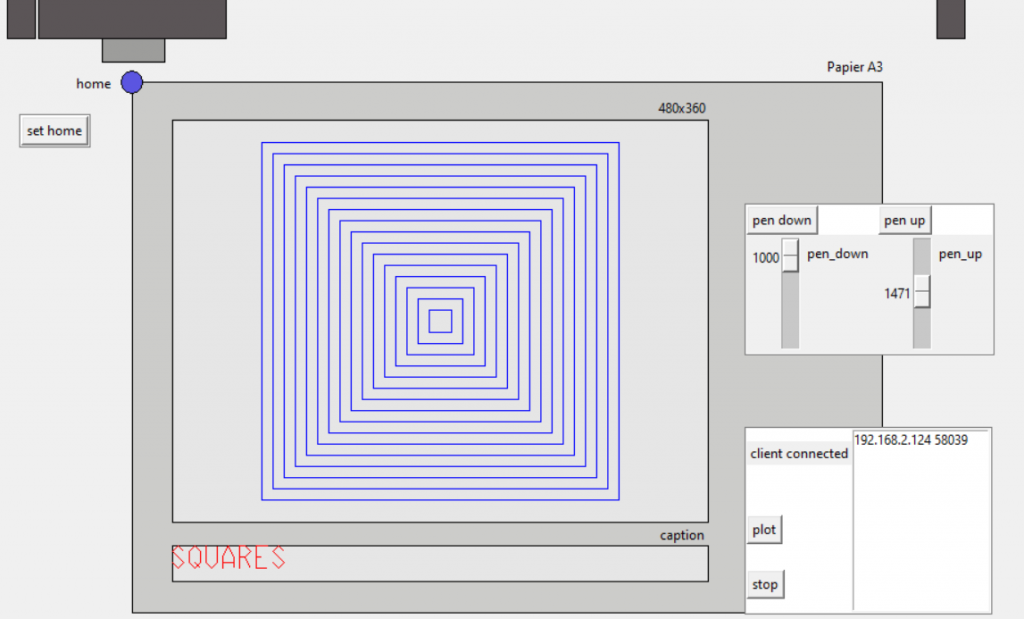
The related output on the plotter server is showing the canvas printed aka the stage visible on the scratch workstations. Some adjustment knobs for pen lifting are needed.

plotter server graphical user interface

Auf die Plätze, fertig, los !

Mit einem toolgestützten Controller Framework für scratch3-Spiele soll die Entwicklung von Spielen mit scratch vereinfacht werden.

Die Ablaufsteuerung eines Scratch-Spieles mit verschiedenen Spielleveln macht Schülern der siebten Klasse einige Probleme:

  • Das Spiel kann einmal gespielt werden, beim zweiten Durchlauf erscheinen die Figuren an unerwarteten Stellen.
  • Um Fehler zu suchen muß das Spiel jedesmal vom Anfang an gespielt werden; einzelne Spiellevel können nicht separat angesteuert werden.
  • Das Einfügen neuer Level ist sehr aufwendig.
  • Hilfe für die Schüler bei Problemen ist schwierig wenn sich ein Programm zu einem verknäulten Spaghetti entwickelt hat.

Bisher wurde ein Controller Framework vorgestellt und die Implementierung auch angeleitet. Die Implementierung war jedoch teilweise papierbasiert und diese Vorgehensweise insgesamt nicht sehr erfolgreich.

Die Arbeitsschritte waren:

  • Erklärungen der Motivation, Vorgehensweise an der Tafel
  • Checklisten verteilen
  • die Abfolge der Spiellevel und der Ereignisse in einem Diagramm aufzeichnen
  • Anhand einer Beschreibung/ Checkliste dann die Scripte für den Controller aufbauen

Diese manuelle Vorgehensweise war nicht sehr erfolgreich. Der Nutzen für die Entwicklung war nicht sofort ersichtlich und statt endlich mit dem Spiel loszulegen wollte niemand gerne erst mal auf Papier irgendwelche Bilder zeichnen.

  • die auf Papier erstellten Diagramme wurden nicht an die aktuellen Programm angepasst und konnten so zum Verständnis des Spieles nicht herangezogen werden. Oder waren dann nicht mehr greifbar, vergessen, nicht abgeheftet.
  • Die Diagramme wurden im ersten Anlauf ‘zu schön’ gezeichnet mit Karopapier und Lineal. Dieser für erste Versionen überflüssige Aufwand benötigt viel Zeit und schöne Diagramme werden weniger bereitwillig geändert.
  • die Diagramme mussten manuell in Skripte und Ereignisse übertragen werden, hier gab es Tippfehler, Abweichungen bei groß-Kleinschreibung, Auslassungen.
  • Individuelle Abwandlungen der Controller-Skripte führen zu einem hohen Aufwand bei der Unterstützung der Schüler.

Mit einem toolunterstützten ‘Controller-Framework’ sollen diese Probleme vermieden werden. Insbesondere muß der Planungsschritt “Ablaufplanung” schnell und unkompliziert durchgeführt werden können.

Für Schüler wird das Framework altersgemäß als Rezeptsammlung bereitgestellt. Nach einer Einführung soll es im Prinzip möglich sein durch einfache Übernahme der generierten Skripte sehr schnell einen Fortschritt zu erzielen. Was dann – hoffentlich – die Motivation steigert das Framework zu benutzen.

Das Framework soll die folgenden Features aufweisen:

  • Einzelne Level können separat gestartet werden während der Entwicklung und Test.
    Das Durchlaufen komplexer Abläufe bis zu einem bestimmten Fehler wird vermieden.
  • Supportaufwand wird durch Standardisierung verringert.
  • Die Ereignisse wie ‘gewonnen’, ‘verloren’ können simuliert werden und erlauben das einfache Verifizieren der Spielabläufe.
  • Eine Erweiterung des Spieles um zusätzliche Level ist einfach möglich.
  • Der Controller, ein Sprite mit dem Namen ‘Dirigent’, gibt Meldungen aus wenn ein neuer Level gestartet wird. Protokollierung kann ggf. einfach nachgerüstet werden.

Mit der Umstellung des Kurses von scratch1.4 zu scratch3 in 2022 wird eine technische Unterstützung mit einem grafischen Tool eingeführt. Die Schüler müssen zwar im Moment weiterhin die generierten Skripte abtippen, aber durch die genaue Abbildung wird ein besseres Ergebnis erwartet.
Eine automatische Erstellung eines importfähigen Sprite ist noch nicht umgesetzt.

Der Post ist eine Überarbeitung eines früheren Artikels über die Ablaufsteuerung: Auf die Plätze, fertig, los !

Bestandteile des Framework

Das Framework implementiert eine Controller Pattern bestehend aus einer Zustandmaschine für die Abläufe und Interfaces/ Templates für Ereignisse im Spielablauf.

Ein zentrale Controller Komponente implementiert als scratch Sprite ist nur für den übergeordneten Spielablauf zuständig.

Alle Sprite erhalten standardisierte Ereignisse für die Ablaufsteuerung.

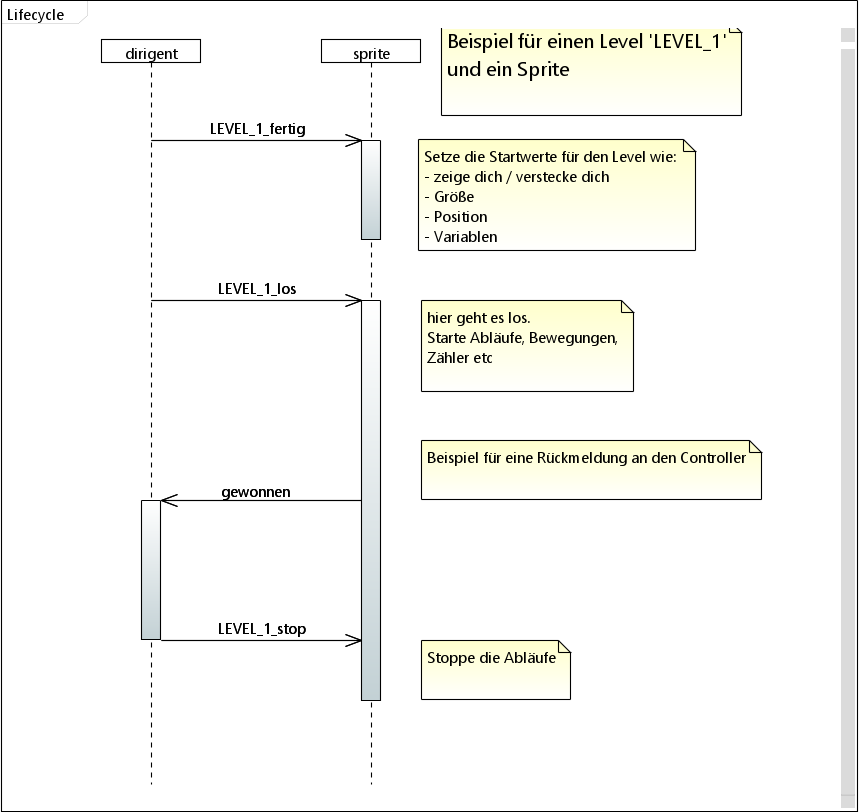
UML Diagramm für die Messages zwischen Dirigent und einem Sprite für einen Level ‘Level_1’

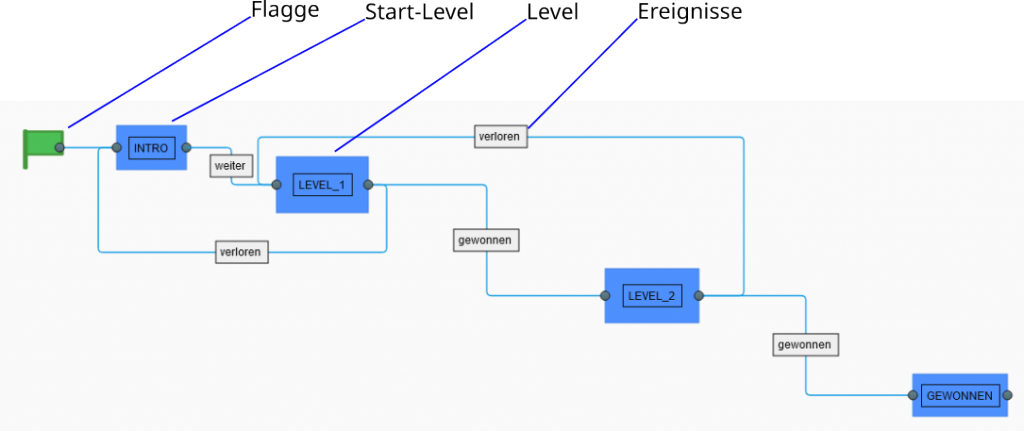
Die Ablaufdiagramme sind grafisch vereinfachte UML StateMachineDiagram.

Die Zustände haben links die ‘Entry’-Port, rechts die ‘Exit’-Port so dass die Pfeile an den Events entfallen können.

Entry-Aktionen werden in zwei Phasen ‘fertig’ und ‘los’ aufgeteilt und über Messages, scratch-Ereignisse angesteuert.

Werkzeuge, Toolunterstützung

Das Tool besteht aus einem grafischen Editor für Spielabläufe und der Möglichkeit daraus den Sprite-Skript-Code zu generieren sowie die Templates für die Ereignisse der Sprite-Spielfiguren.

Es wurde wenig Aufwand in eine ‘smarte’ Oberfläche investiert:

Bedienoberfläche des Editor.

Technisch gesehen läuft das Tool im Browser, es wird eine javascript-Bibliothek draw-2d verwendet.
Aus einer einfachen Palette werden die Elemente auf die Arbeitsfläche gezogen. Die Verbindungen werden mit der Maus erstellt.

Undo, Redo werden unterstützt. Alle Veränderungen werden in einer lokalen Datenbank persistiert. Mit “Store” werden Ergebisse gespeichert und die bis dahin angefallen Zwischenstände dann gelöscht.

‘Print’ speichert die Grafik als svg-Datei auf dem Rechner. “skript:dirigent” und “skript:sprite” aktivieren den Generator und die grafische Ausgabe der Skripte. Bisher muß dann manuell abgetippt werden. Für das gezeigte Beispiel sind das im ‘Dirigent’ etwa 50 Blöcke.

Die Server-Komponente ist in python mit ‘tornado’ implementiert, ‘sqlite3’ übernimmt die lokale Speicherung.
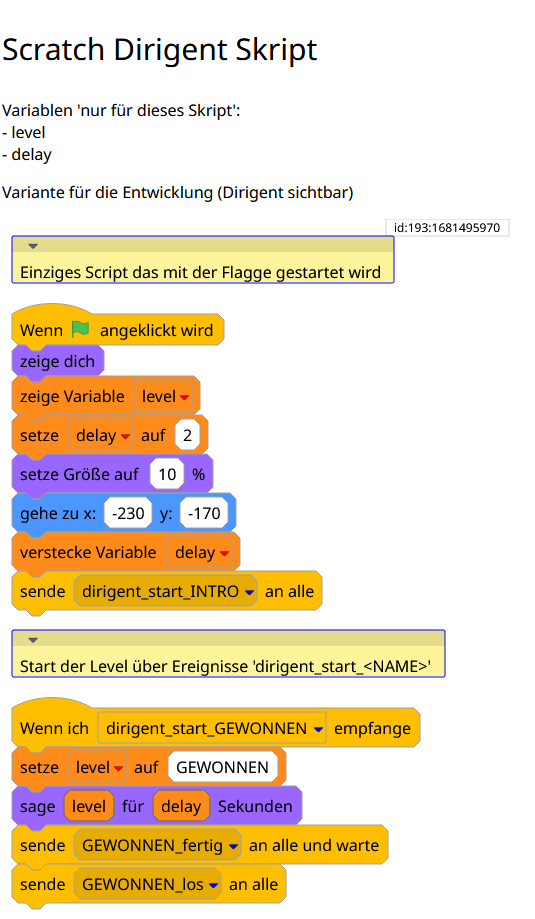
Die Generierung der Grafiken erzeugt SVG in Webseiten, hier ein Beispiel für die Ausgabe des “skript:dirigent”:

Anzeige des generierten Dirigent-scratch-Skript

Die Anzeige der Skripte lehnt sich an die aus scratch3 bekannten Formen und Farben an; die schwarze Schrift ist eine Abweichung von der Pastelloptik und besser lesbar.

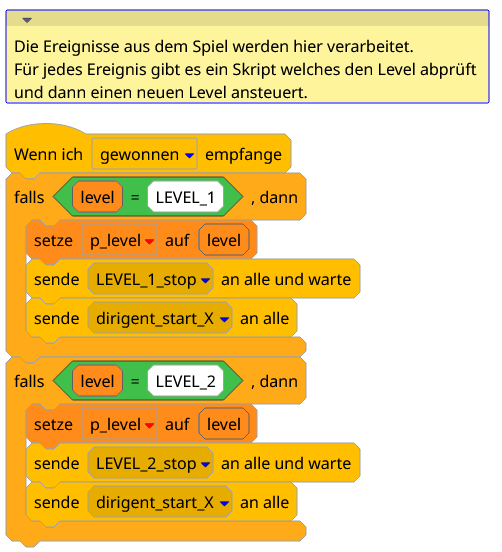
Das Controller-Framework hat als zentrale Komponente ein scratch-Sprite mit dem Namen ‘Dirigent’. Das ist der ‘Controller’ des Spiels.
Technisch gesehen implementiert der Controller einen Zustandsautomaten, die Level sind die Zustände und die Übergänge werden über Ereignisse gesteuert. GesStartet über die grüne Flagge.

Die einzelnen Sprites in Scratch (Spielfiguren) erhalten eine standardisierte Schnittstelle aus Ereignissen (Messages).

LEVEL_1_fertig: Dirigent zu Sprites. Setze die Startwerte für den Level wie:
– zeige dich / verstecke dich
– Größe
– Position
– Variablen

LEVEL_1_los: Dirigent zu Sprites. Hier geht es los. Die Abläufe werden gestarten, Bewegungen aktiviert etc.

LEVEL_1_stop: Dirigent zu Sprite. Der level ist beendet, beende Aktionen des Sprite. Stoppe Schleifen.

gewonnen, verloren, weiter o.ä.: Sprite zu Dirigent. Damit wird der Übergang zu einem neuen Level gestartet. Hier können die Schüler (fast) beliebige Namen verwenden.

In den Beispielen werden die Level in Großbuchstaben geschrieben. Das erleichtert die Übersicht.

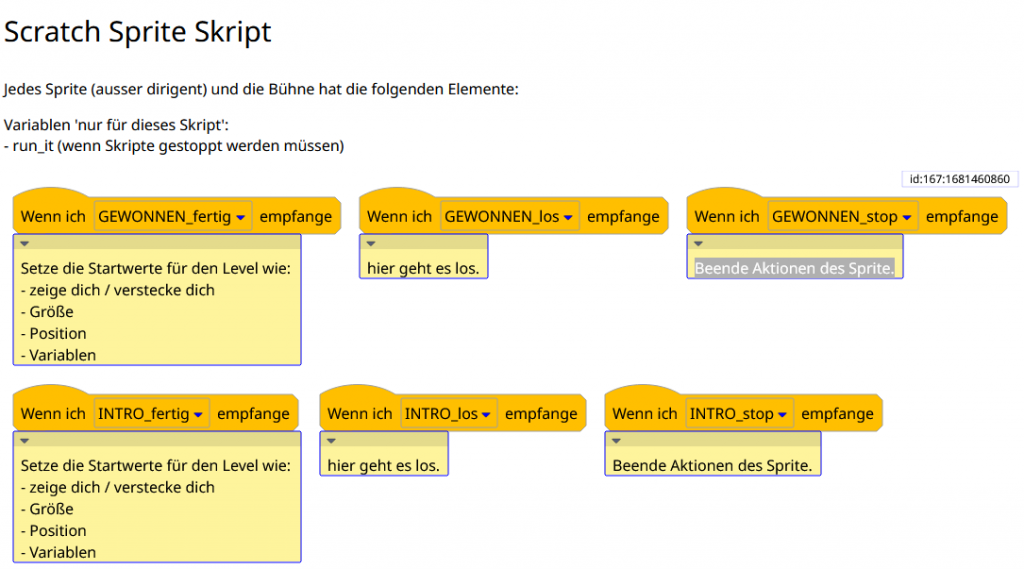
Aus dem Ablaufdiagramm erzeugte Scratch-Snippet für ein Sprite.

Die Schüler füllen – statt den Kommentaren – ihre eigenen Abläufe ein.

Spezialfall ‘wiederverwendbarer Level’

In den von Schülern gezeichneten Ablaufdiagrammen tauchen regelmässig Level auf, die wie ein Unterprogramm an verschiedenen Stellen verwendet wurden. Beispiele sind ein Zwischenlevel ‘der level wurde gewonnen, weiter mit dem nächsten Level oder beenden ?’

Bisher mussten solche Anforderungen durch spezifische (unique) Level gelöst werden oder die Programmierung wurde ad hoc ergänzt.

Das Tooling unterstützt diesen Sonderfall.

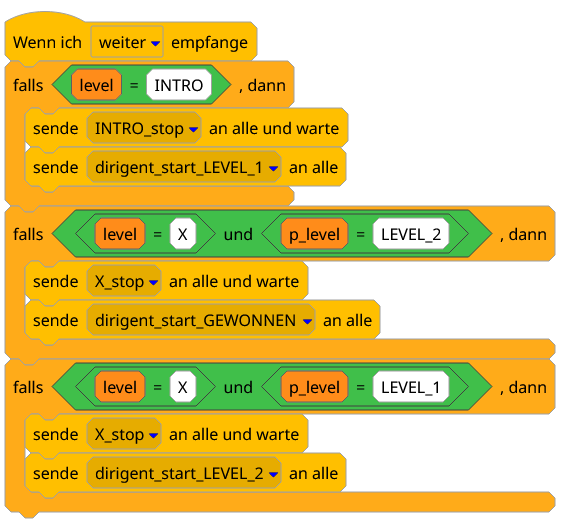
Komplexes Beispiel mit Zwischenlevel ‘X’

Die Skripte des ‘Dirigent’ sind sehr ähnlich wie des einfachen Beispiels, lediglich an den Stellen wo die Zwischenlevel eingefügt sind wird eine weitere Variable ‘p_level’ verwendet.

Sprite ‘Dirigent’, Beispiele für das Verarbeiten von Ereignissen mit ‘ZwischenLevel’.

Indendation problems in python

Indentation is a part of code structure in python.

Indentation problems cause error messages like

IndentationError: unindent does not match any outer indentation level
IndentationError: expected an indented block after ‘for’ statement on line 3


There are many, really many tutorials in the web about this topic.
https://python.land/python-tutorial#Pyt … r_features
https://peps.python.org/pep-0008/#indentation
https://www.w3schools.com/python/gloss_ … tation.asp

Usual problems are:
– various deep levels, e.g. 3 blank or 4 blank deep mixed (use 4 blanks)
– mix of blanks and tabs for indentation.

Thonny is a common IDE, editor for beginners. See https://thonny.org/
Too see the difference between tabs and blanks, it is good to have ‘highlight tab characters’ enabled in the options.

thonny_options.PNG

Then in the thonny editor, tabs are displayed in a special color. Usually a good idea to replace tabs by blanks.

thonny_tab.PNG

The sample shows two tab in second line.

There are text editor around which allow better visibility of all these invisible characters in a text. Here an example of a blank followed by a tab in second line.

editor_show_all_characters.PNG

This is from “Notepad++”; good to have such a tool in the toolbox to fix stubborn problems.

Snap! integration with scratchClient

Some work was performed to integrate Snap! with scratchClient. Here a preview of current results.

Snap! is a viable alternative to scratch. Scratch 1.4 on raspberry pi is quite fast, but latest implementation is buggy. Full screen display for example is no longer working. Scratch 2 was based on flash and is not recommended; scratch 3 has again a different extension method and investigation is on todo-list.

The complexity of Snap! blocks is a hurdle for a school environment. Can be handled partially by making blocks invisible. For the menu entries some work needs to be done to hide /preset some of them to avoid confusion for the kids in school.

Snap! sources can be downloaded from https://snap.berkeley.edu/ . It runs from the file system; serving from a local web server as python tornado is easy.

The system context is as with the legacy scratch1.4, 2 integration: have Snap! started, have scratchClient running and the config definitions from the xml config files are exported into Snap!.

Current implementation is proof of concept which concentrates on communication using websocket and configuration setup. Plan is to have a dedicated snap-scratchClient implementation and not to integrate this with legacy scratchClient. This reduces test effort and allows for easier rework of event distribution and web page handling.

Snap sources will be provided from a local tornado server; the data communication also goes to this tornado instance.

When Snap! is started, then scratchClient library needs to be loaded.

Menu entries.

The library list is adjusted by the server. For demonstration purpose only scratchClient- and catch-errors is provided. The server has a whitelist/ blacklist for libraries provided. This is part of the ‘reduce complexity’ effort.

Library list provided by server.

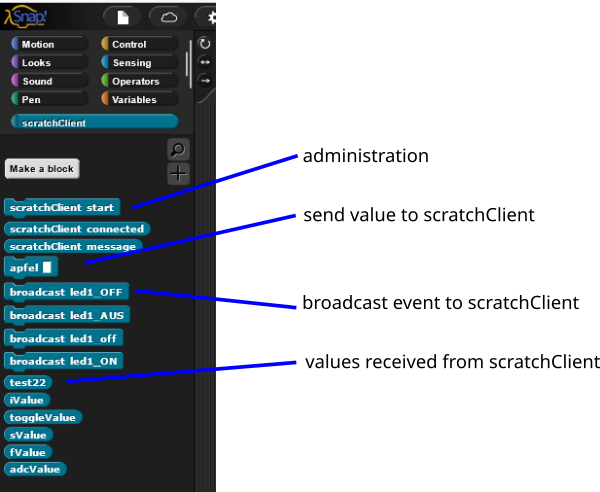
The initial blocks are opened in a category ‘scratchClient’.

scratchClient library blocks.

The command ‘scratchClient start’ initiates the websocket communication to the server and downloads the block definition for current adapter. Based on configuration in scratchClient additional blocks are created.
It should be possible to start the communication with the library import; this needs further investigation.

The ‘connected’ reporter is boolean connection state; ‘message’ is providing last raw websocket messages for debug and will be removed.

Palette created from scratchClient configuration.

Unfortunately there are no ‘hat’-blocks available which could react to events sent from scratchClient. Only way to handle this was to preload the broadcast-event names into the event hat message list.

Technically this is achieved by creating a hidden custom block which uses do_broadcast blocks with the event names.

scratchClient event preloaded into the broadcast hat.

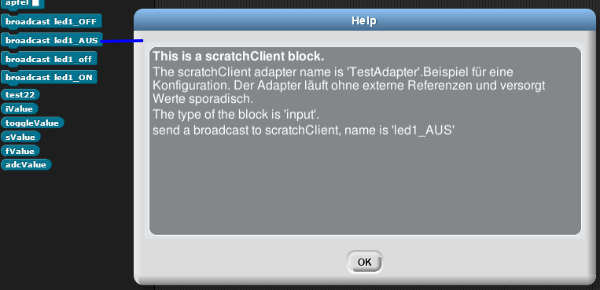
Help text for the blocks is provided by the server, current implementation is generated from scratchClient xml configuration.

Help Text created from adapter XML.

The screenshot shows a mix of information from xml configuration and some text from the server.

<adapter class='adapter.test.TestAdapter' name='TestAdapter'>
		
    <description>A test adapter. Provides Output update every some seconds.</description>
    <description lang="de">Beispiel für eine Konfiguration. Der Adapter läuft ohne externe Referenzen und versorgt Werte sporadisch.</description>
	
    <input name='low'>
	<broadcast name='led1_OFF'/>
	<broadcast name='led1_AUS'/>
	<broadcast name='led1_off'/>
    </input>
...

The configuration snippet shows adapter description for different languages.

New Features: I18N

Translation support is implemented from start.

The adapter xml configurations can be extended with translations. Snap! block definition can be multi language and log messages of the server can be translated.

Work to be done

All the backend implementation needs to be done. scratchClient configuration loading, instantiating of the adapter. Event distribution between the scratchClient modules. Web page redesign of course. And documentation update.

A schedule is not yet available.

Auf die Plätze, fertig, los !

Um ein Spiel zu starten kann man den Ablauf ‘auf die Plätze, fertig, los’ verwenden.

Die Idee ist, dass man nur ein Script mit einer grünen Flagge hat. Dieses sorgt dann dafür, dass erst mal alle Sprites sich auf ihre Startposition begeben, die Variablen zurückgesetzt werden und dann die Abläufe starten.

Dieses kleine Start-Skript gehört üblicherweise der Bühne.

Es gibt nur ein Skript mit einer grünen Flagge:

Dieses Skript schickt dann ‘auf_die_plaetze’. Hier ist das ‘warte’ wichtig, weil alle anderen Skripte das erst mal fertig bearbeiten müssen.

Bei ‘auf_die_plaetze’ bewegen sich alle Sprites auf die Startposition und machen sich sichtbar oder unsichtbar, je nachdem was im Spiel erforderlich ist.

Der nächste Befehl ist ‘fertig’. Hier werden die Variablen auf den Startwert gesetzt. Auch hier warten.

Und zuletzt wird ‘los’ geschickt. Jetzt starten die anderen Skripte.

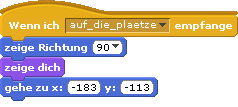
Beispiel für Sprite, Aktion ‘auf die plaetze’

Die einzelnen Skripte empfangen die Nachrichten und setzen sich auf ihre Positionen.

Die Richtung sollte gesetzt werden, vor allem wenn das Sprite sich drehen kann.

Die Sichtbarkeit ist wichtig, ‘zeige dich’ oder ‘verstecke dich’.

Die Position am Anfang muß gesetzt werden, vor allem wenn das Sprite sich bewegen kann.

Im Bild nicht gezeigt: das Kostüm sollte auch auf den Startwert gesetzt werden.

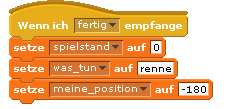
Beispiel für Sprite, Aktion für ‘fertig’

Bei ‘fertig’ setzen die Skripte ihre Variablen auf den Startwert.

Variablen ‘für alle Objekte’ werden typischerweise in einem Skript auf der Bühne zurückgesetzt oder vielleicht auch bei der Hauptfigur des Spiels.

Die Variablen, welchen einem Sprite gehören ‘nur für dieses Objekt’ müssen vom Sprite zurückgesetzt werden.

Kein Beispiel: Sprite Aktion für ‘los’

Klar, bei ‘los’ geht es los. Es werden die Bewegungen gestartet, die Überprüfungen ob der Spielstand erreicht ist und all die anderen notwendigen Dinge.

Hier kann kein sinnvolles Beispiel gezeigt werden, da sich die Aktionen bei ‘los’ je nach dem Spiel ändern.

Beispiel für ein Spiel.

Ein ganz einfaches Spiel ist im Anhang zum Herunterladen.

Das Beispiel ist für scratch1.4 geschrieben.

Beispiel-Spiel herunterladen

Pattern

Das geordnete Starten einer Anwendung funktioniert nicht immer auf Anhieb und macht Programmieranfängern immer wieder Probleme.

Typische Indikatoren für solche Probleme sind

  • Das Spiel läuft einmal korrekt los, beim zweiten Mal nicht mehr.
  • Sprites sind nicht sichtbar bei Beginn oder erst später benötigte Sprites tauchen am Anfang schon auf.
  • Das Spiel meldet ‘gewonnen’ schon direkt nach dem Anfang, da eine Spielfigur schon auf dem Zielbereich steht.

Das Pattern bietet eine Vorgehensweise für ein geordnetes Hochfahren einer Anwendung.

Der Begriff ‘Pattern’ wird in Anlehnung an /Design Patterns: Elements of Reusable Object-Oriented Software’ Gamma, Helm, Johnson, Vlissides/ verwendet.


scratch 1.4 mesh network with scratchClient

Scratch 1.4 on raspberry pi allows to connect with other scratch instances on other computers.

This is an experimental feature. This feature is not available in scratch1.4 for linux or windows, not in scratch2.

With this feature multiple scratch 1.4 can share events and (global) variables.

As this feature is experimental, there are some constraints and problems especially when scratchClient is used also.

ScratchClient has a feature to interconnect computers too. This uses scratchCommunicationServer.py which allows filtering and segmentation of larger networks.

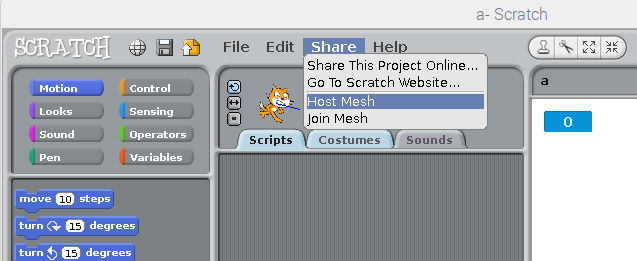
Enable Mesh Session

Scratch 1.4 has a ‚Share‘ menu point. This menu has different content when ‚shift‘ is pressed before the mouse click.

Enable mesh session by ‘shift’ and press ‘Share’-menu.

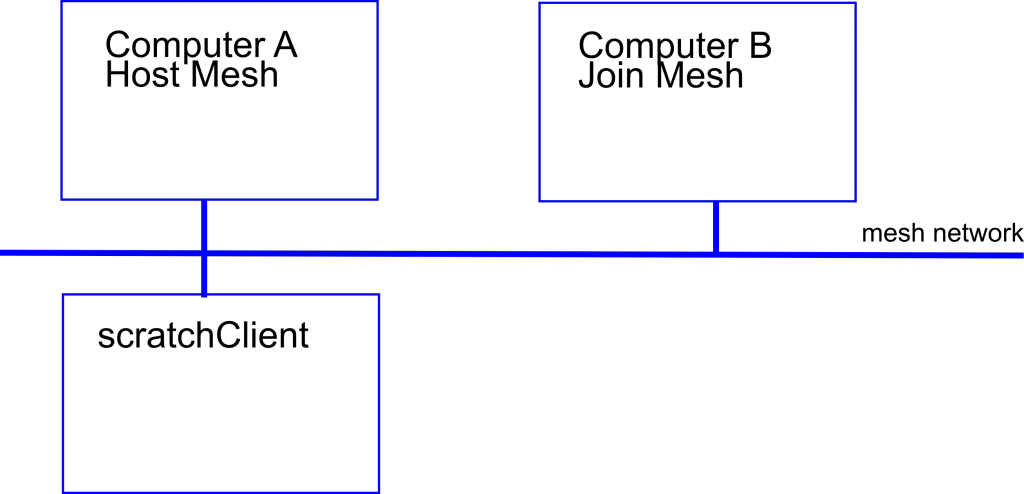
‚Host Mesh‘ means that this scratch is opening the mesh. It ‚hosts‘ the mesh. In other words this scratch becomes a server.

‚Join Mesh‘ means that the scratch connects to a mesh network another computer has opened before. In other words this is a ‚client‘. The client needs to know the IP address of the server.

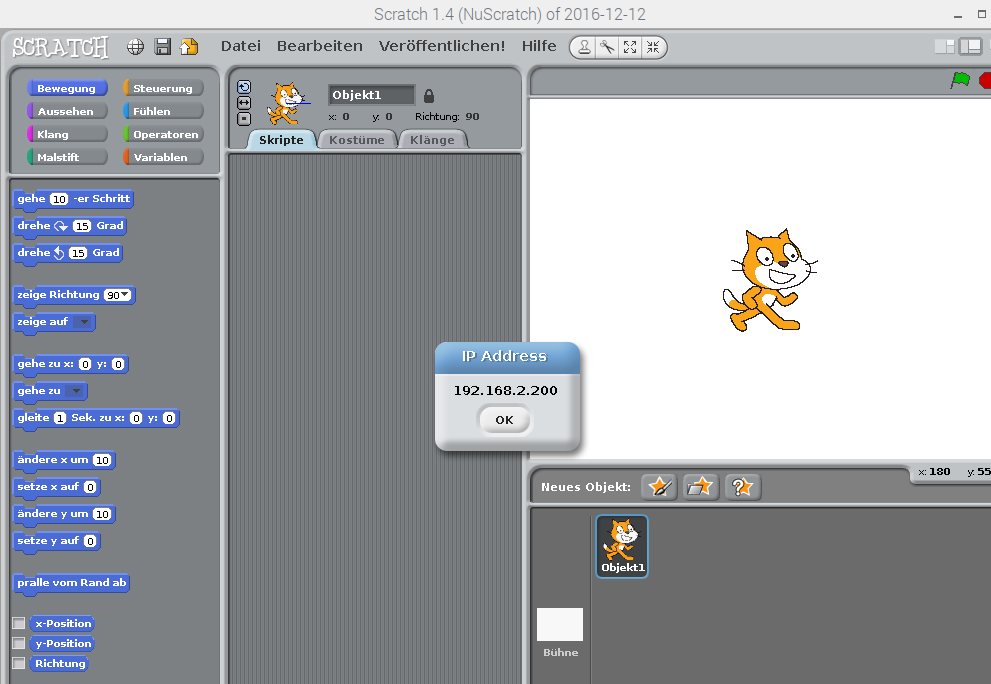
When ‚Host Mesh‘ is executed, the IP address of the computer is displayed.

There is a menu entry on a ‚host‘ computer which allows to display this again:

Computer A:

enable ‘host mesh’ session
display ip address, e.g. 192.168.2.200

Computer B:

join mesh session
enter ip address of computer A

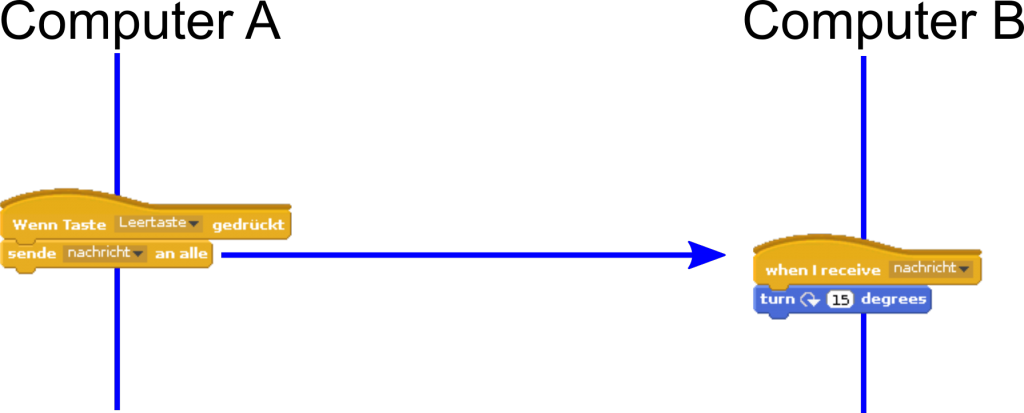
Broadcast events of one computer are sent to computer B also.

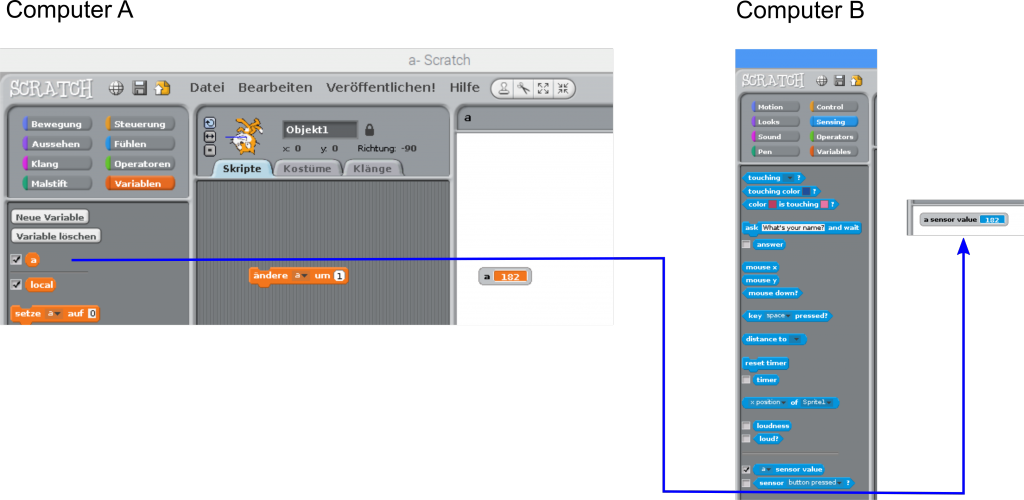
Global variables of one computer are visible on ‘sensing’ tab, sensor values on the other computer.

The variable (here ‚a‘) can only be changed on the one computer where it is is created. Sensor value can‘t be changed.

Best Practice

  • Scope: Variables should be ‘for this sprite only’ whenever possible. Use ‘for all sprites’ only if needed or when these should be transferred to other computer.
  • Naming: Variables and events which need to be transferred should get a special name which includes the sending computer name. So if sending computer is ‘box07’ and variable is ‘a’, then name is ‘box07.name’.

Problems, Constraints

Persist connection

The client side does not store it’s state in the project file. ‘join mesh’ needs to be done each time the project is opened.

Topology with scratchClient

scratchClient connection works on server side only. On client side, when sensor network is enabled then the mesh connection is stopped and thus scratchClient can’t be used.

The ‚enable remote sensor connections‘ command is not needed when ‚Host Mesh‘ is used.

Warning

ScratchClient issues a warning about an unknown command, but this does not stop anything.

Infrastructure

The involved computers need to be connected to a network.

When computers are configured to use fixed IP-Addresses, then for a two computer network a crossover-ethernet patch cable can be used.

Network connection on a raspberry pi.

The color of a cable does not imply whether a normal connection or crossover connection type cable is used.

howto: Edit scratchClient Config Files

There was a question on how to edit scratchClient config files. There was the need to add a Button to a GPIO. Button inputs are handled by a GPIOEventInput-Adapter.

This short walkthrough will not explain all the details but will concentrate on

  • where to find the files
  • use an editor
  • copy / paste an adapter
  • adjust relevant sections
  • save
  • and run it.

Where to find the files

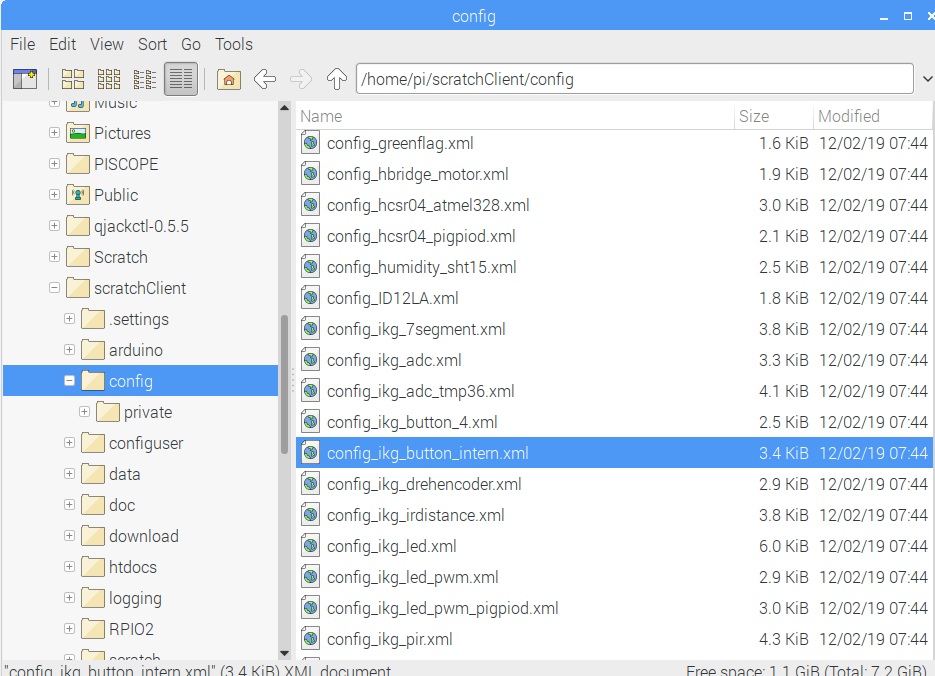
Configuration files for scratch usually are in directory /home/pi/scratchClient/config/ . The ‘/’ at the end is used to mark a path as a directory.

Use an Editor

Config files are XML-Files, eXtensible Markup Language with the ending ‘.xml’. There are special editors for these files, but as xml is plain text a text editor can be used to edit.
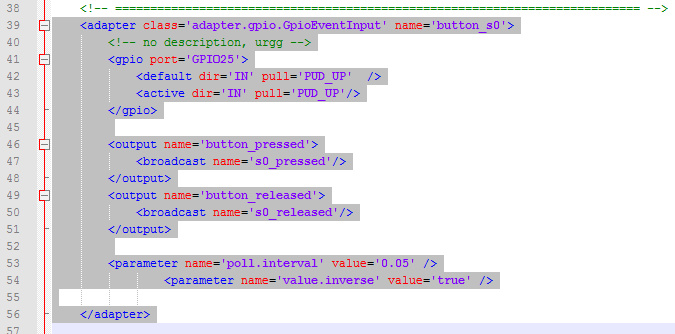
For almost each adapter type there is a sample in these files. We start to edit the marked file config_ikg_button_intern.xml as it already contains a GpioEventInputAdapter which will be modified. Right-click on the file and select ‘open with – Text Editor’.

When the file is open, there are sections visible in brackets. Adapter definitions start with <adapter> and end with the next </adapter>. There can be multiple of these sections in one config files which are activa6ted by scratchClient at a time.

The adapter is light grey marked in the above screenshot. The colors are different between various editors.

Copy / Paste an Adapter

Copy this adapter and paste behind an existing adapter, behind the </adapter>-element. The sequence in the file is not important. You will notice that the sequence is used for the display in the adapter view in the browser. But technically all adapters work the same independent from their position in the file.

Adjust relevant sections

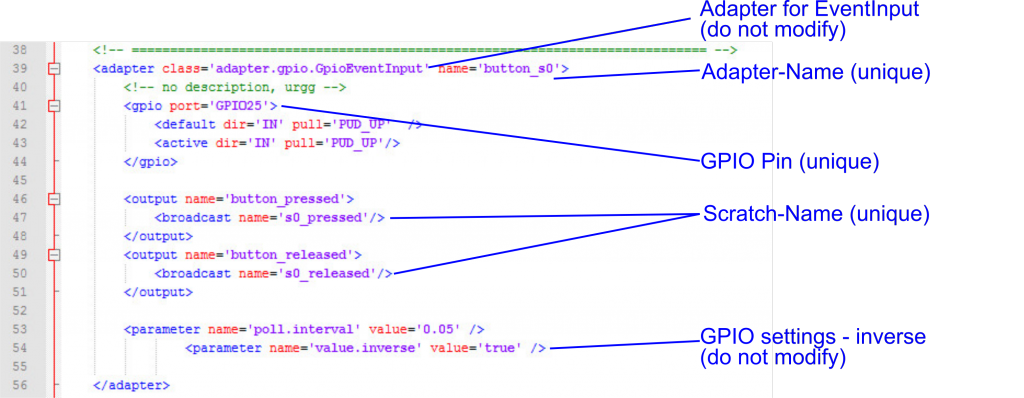
The config file provides the data for scratchClient hoq the adapter shall work. Some of the information needs to be unique, other information is needed to have meaningful names in scratch.

  • Adapter-Name: give the adapter an unique name. Best is to use a name which is close to its use in the system, e.g. ‘button_22’ or better ‘button_motor_left’. The ikg_config files are quite generic and therefor have most times just numbers. As you will use these files for a project, choose more meaningful names.
  • GPIO-Pin: A GPIO pin is only allowed once in a file. Select a free GPIO pin. The numbering scheme is BCM-numbers. Do not choose GPIO used for SPI, I2C or the Hat-eeprom. These names are case sensitive.
  • Scratch-Name: an event-adapter has two event outputs for button_pressed and button_released. These need to be mapped to the names used in scratch. Use a meaningful name like ‘button_motor_left_pressed’ and ‘button_motor_left_released’.
  • The GPIO settings are ‘inverse =true’ for a button which is connected between GPIO and ground. Leave as it is. The poll.interval is 50 ms which is fast enough for even fast games.

Save the file

Save the file in a different location. Choose directory /home/pi/scratchClient/configuser/ which is dedicated for user files.
Files in userfiles are searched first at scratchClient startup. And will never be overwritten on updates.
Give the file a name which is releted to the project, e.g. config_project.xml. The extension ‘.xml is needed.

Run the file

Start scratchClient.

cd ~/scratchClient
python3 src/scratchClient.py -c userconfig/config_project.xml

The command line in scratchClient allows some flexibility to lookup the config files. The -c option allows to omit the extension and the prefix ‘config_’. The lookup procedure first looks in ./userconfig/’, if not found in ‘./config/’. The following command line is performing the same file lookup as above.

cd ~/scratchClient
python3 src/scratchClient.py -c project

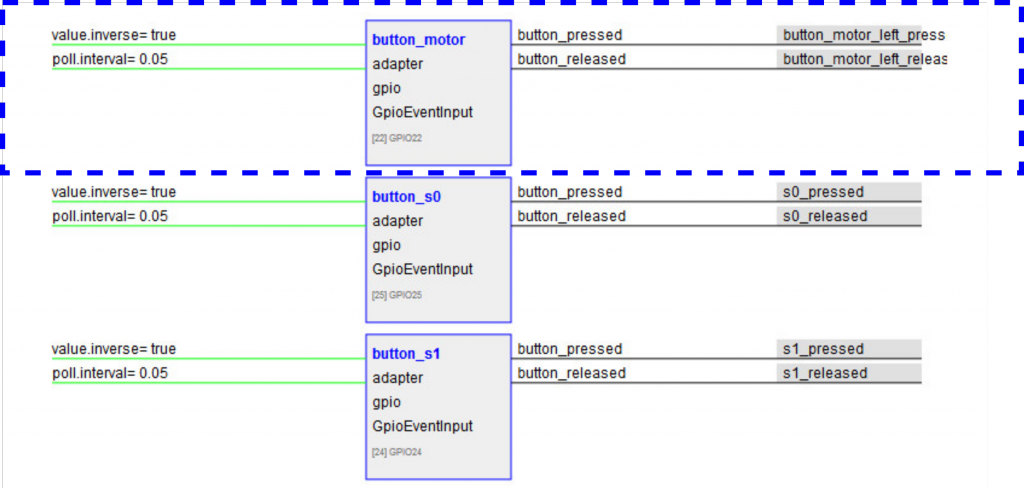
Check the scratchClient browser adapter view localhost:8080.

The name button_motor is visible. The quite long scratch names are truncated, but this only in the view.

Editing a .xml file can be a challenge. If there are problems, scratchClient will reject to load the file and give error messages in the console.

servo for scratchClient

During a conversation on scratch forum there have been quite a few issues to get a servo run on someones computer.

Here a video on installation scratchClient on a new sd card, run scratchClient and prepare a script in scratch1.4.

install scratchClient and running servo sample.

The sequence is shortened a bit. Especially the system update is at multiple speed.

When the servo moves, there is noticeable jitter. Caused by delays in python and operating system.

scratch2 connected to scratchClient

Did you ever want to control GPIO from scratch2 ? Or other sensors connected to a raspberry pi ?

The last days I worked on connecting scratch2 with GPIO on raspberry and more.
To be precise, this is done by either using scratchx or since june 2017 with the standalone version of scratch2 for raspbian.

  • use scratch2 version named scratchX which supports ‘scratch extensions’. This version is identical to scratch2 with few limitations. Or use the standalone version on raspberry.
  • extending scratchClient to talk with scratch2 and providing sensor values and events, but also receive values from scratch2 and events.
  • scratchClient using adapters to connect peripheral devices as usual. For example to GPIO.
  • The blocks in scratchX are defined from the information available in the config file used by scratchClient.

This new version of scratchClient is still supporting scratch1.4 and there are no changes in the config files needed.

One of the limitations in scratchX are that sharing projects is not possible.

The extension blocks in scratchX are defined using the definitions from the config xml file from scratchClient. So there is no programming effort needed to build the extension file.

Current implementation allows to send/receive values and events from scratchX to/from scratchClient. This is similiar to the features available in scratch1.4 with the broadcast system.

Problems, Inconsistencies with scratch 1.4 broadcast system

In legacy 1.4 scratch, there are some predefined blocks for motors and sensor names for scratchBoard. This needed many explanations for unexperienced users to avoid confusion.
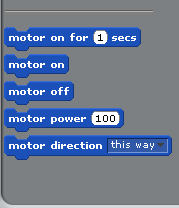
scratch 1.4 motor blocks in sensing palette
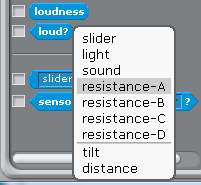
scratch 1.4 default sensor names

It was also difficult to explain that values from scratchClient are received as sensor values, but values to be sent out need to be defined as variables ‘for all sprites’.

In addition to this, the extra step ‘enable remote sensor connections’ is hidden down in a context menu of a block on lower edge of the window.

Advantages of the scratch2, scratchX block based interfacing

In scratchX, all the capabilities of the external system are exposed as blocks. This avoids all the mentioned problems from legacy scratch 1.4.

Modifications in scratchClient

scratchClient in its initial design is scratch1.4 centric. The start and stop logic is scratch 1.4 oriented and needed another structure.

During this work, the internal web app was lifted to use tornado framework. Which has build in websocket support and is easier to use as cherrypy. As scratchX is online only, the connection to a local data provider needs to bypass the ‘same server policy’ and this was quite simple to achieve with tornado.
Monitoring and simulation of events is still possible by using the internal web server. Some bugs have been removed in the web pages on this way.

Setup procedure

As the experimantal scratchClient is merged into scratchclient, the installation is same as for scratchClient.

Start scratchClient with the configuration xml file for your hardware. I recommend using python3 to run scratchClient. Unicode support is the reason for this.

Context

scratch2 / scratchX does not need to run on same computer as scratchClient. The communication beween scratchX and scratchClient uses websocket and http requests. In my test environment, scratchX runs on windows and scratchClient either on a raspberry or on windows.

Start scratchX

Load http://scratchx.org/#scratch into the browser.

Load extension loader

In ‘more blocks’, ‘Load Experimental Extension’,
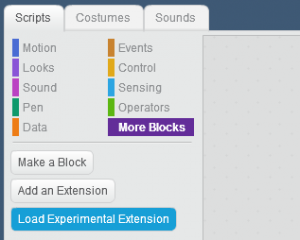
press on Load Experimental Extensions and open Extension URL
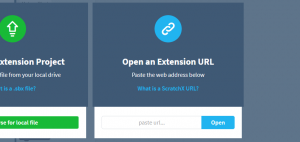
Paste the following url into the form

https://megjlow.github.io/extensionloader.js

This url brings the Load Extension Block into the additional block palette.
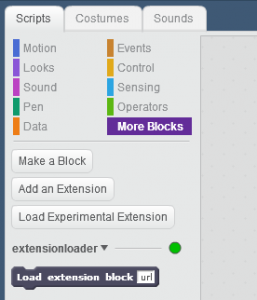
Connect to scratchClient

The Load Extension Block is now used to load the scratchClient configuration. Best practice is to prepare a small script in stage which loads the scratchClient config.

Add a wait block before the ‘broadcast [blueFlag]’ with 5 seconds. This gives the extension the needed time to load and to initialize.

The program should use ‘blueFlag’ in all places where the green flag hat  is usually used.

The url to use to load the scratchClient extension is

http://localhost:8080/scratchx/js/extension.js

Copy paste this url into the ‘load extension block’. If scratchClient is running on a different computer, change ‘localhost’ to either the other computer’s IP-address which is something like 192.168.2.203 or perhaps a more meaningful name if the network configuration allows.

Validation

See the ‘green’ dots to the right of the extension name. If these turn red, connection is lost. Possibly scratchClient has been stopped, can’t be reached or other problems. In my tests the connection was stable.
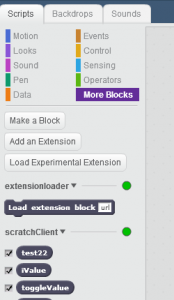
Extra step for the preview: start legacy scratch and open remote sensor connection.

Loading a project using scratchClient extension

A program loaded from file system shows the Load Extension Block, but not the scratchClient extension. The blocks from the scratchClient extension are displayed as red blocks.
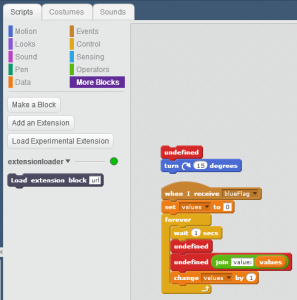
When program is started with green flag and the proposed initial script is executed, the Load Extension Block reads the extension from scratchClient and the program can be used.

Start scratch2 on raspbian

In raspbian jessie june-2017, there is a standalone scratch2 version available.

Start from programming/scratch2.

Press shift key and the file menu. The file menu now displays more options.
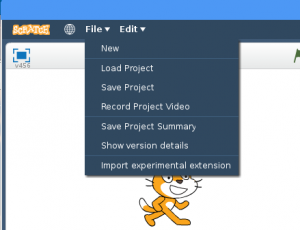
Select import experimental extension.
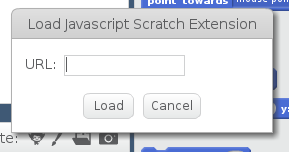
Paste the url into the dialog: http://localhost:8080/scratchx/js/extension.js

Validate in ‘more blocks’. The example here is for a test adapter and looks different for your configuration file.
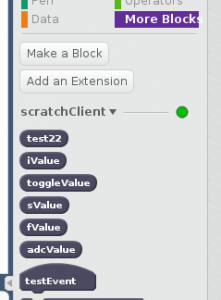
This scratchClient version is released

There are no known limitations for this release.
Just start scratchClient and use either scratch1.4 (enable remote sensor connections) or follow the procedure to set up a scratch2/ scratchX connection.

Some features have been removed. Command line switches to control the gui are removed. As the web app server is needed to connect to scratchX, this does not allow to disable the web browser.

Example: Controlling two wheel robot pi2go with scratch2

The tests for the scratchX integration have been performed with a new pi2go-configuration. This includes GPIO, PWM, hardware PWM and ADC chips.

The monitoring/simulation web page display the many inputs and outputs available for this robot.
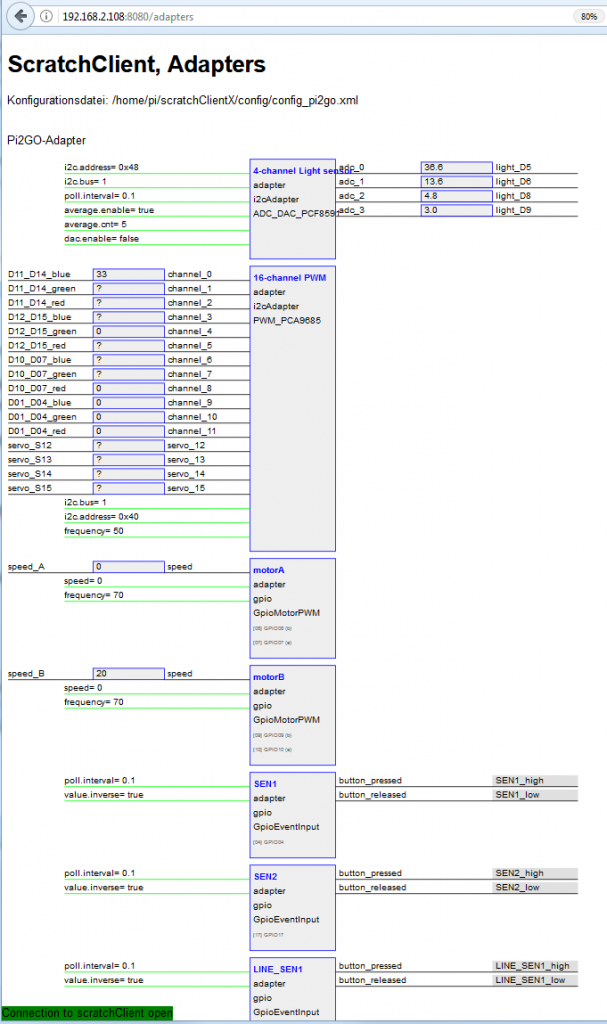
Not all adapters fit on the page.

The blocks build from this config in scratchX are (not all blocks shown).
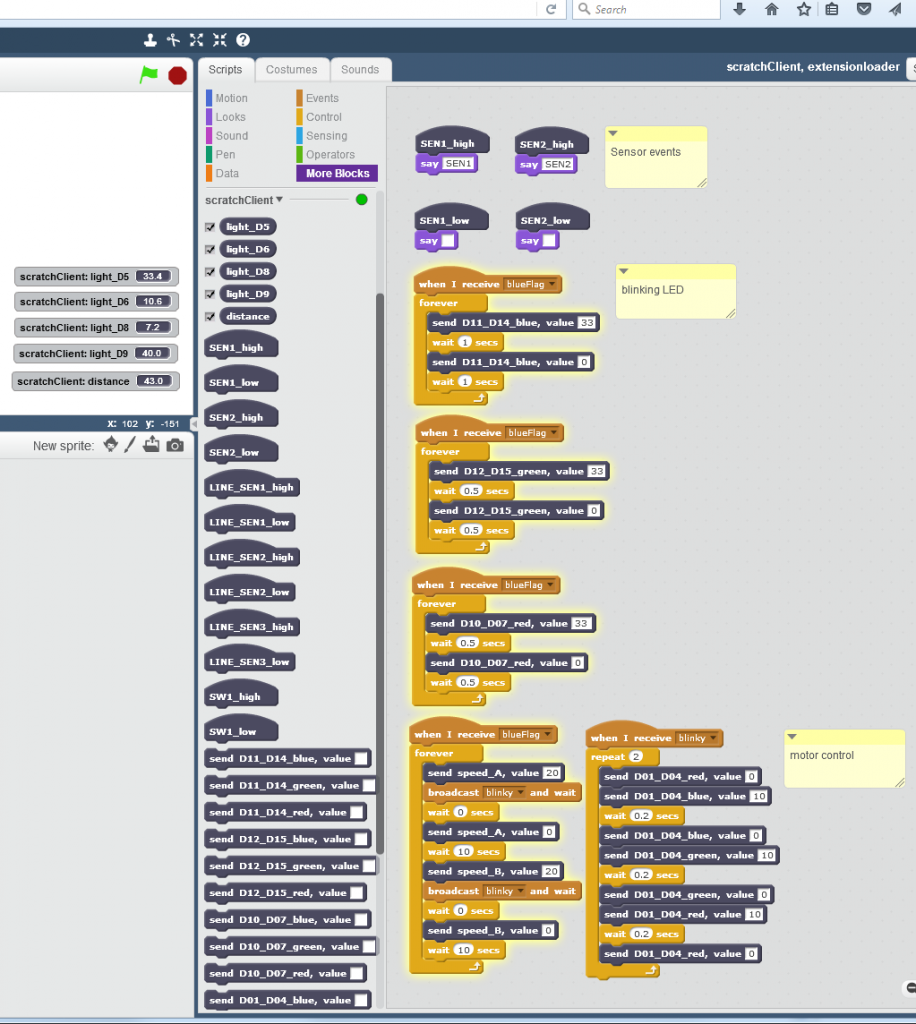
On stage, there are the lights reporters and distance reporter visible.