MQTT Description
MQTT, Message Queue Telemetry Transport, is a is an ISO standard for a publish-subscribe based messaging protocol. It is based on TCP/IP (the ‘usual’ network protocol) and especially designed for small devices and low network bandwidth.
A typical infrastructure contains at least one MQTT-Broker and one to many clients connected to the broker. This infrastructure can be spread to many computers.
A broker just receives messages sent by clients and distributes these to those clients which have subscribed to messages with specific topics.
A MQTT-message is build of a topic and a payload. Topics are strings like ‘home/room1/temperature’ or ‘client1/status’. Payload can be whatever data are needed to be send, this can be strings, binary data as integers, data structures. The broker does not process the data, it is up to the subscriber to ‘know’ how to process the payload.
From the description so far it is clear that there is the need to design the topics in a way that the system is extensible. This is paperwork, most of the time.
There are many more features in MQTT. See the mqtt.org homepage for more details.
scratchClient MQTT-adapter configuration
For scratchClient, the MQTT-adapter can publish messages and subscribe to topics. The topics managed are defined in the config xml. a sample file is included in the distribution.
    <adapter class='adapter.iotAdapter.MQTT_Adapter'  name='mqtt'>
        <description>interface to a mqtt-server</description>

        <!--
           this adapter does implicit input_value and output_value-configuration
           based on the content of mqtt-Tag.
              mgtt/publish/@variable definitions are used as scratch variable names.
              mgtt/subscribe/@variable definitions are used as scratch sensor names.
        -->
        <extension>
        <mqtt>
            <!--  when @variable is omitted, the topic is taken as variable name -->
            <publish topic="scratch/sample/a_value" />
            <publish topic="scratch/sample/b_value" variable="b_value" />
            <publish topic="scratch/sample/c_value" variable="c_value" />

            <subscribe topic="scratch/sample/d_value" variable="d_value" />
        </mqtt>
        </extension>

        <parameter name="mqtt.server" value="192.168.2.133"  />
        <parameter name="mqtt.port" value="1883"  />
    </adapter>
ScratchClient needs definitions on which variables to send out ‘publish’ and which ones to provide as sensor values ‘subscribe’.
The publish definition can be as short as the example here. This short definition takes the topic name also for the scratch variable name.
<publish topic="scratch/sample/a_value" />
In scratch, a variable named ‘scratch/sample/a_value’ will be published by the topic ‘scratch/sample/a_value’.
When more control on the scratch variable name is needed, the extended definition can be used:
<publish topic="scratch/sample/b_value" variable="b_value" />
Now a variable in scratch ‘b_value’ is published with topic ‘scratch/sample/b_value’. I prefer to take the scratch name as the last section in the topic, but the variable name can be any valid name for scratch, e.g. ‘temperature’ or ‘xyz’.
<publish topic="scratch/sample/b_value" variable="temperature" />
For the subscribers, the definition is
<subscribe topic="scratch/sample/d_value" />
This will result in a sensor value reported with name ‘scratch/sample/d_value’. There is also the possibility to match the sensor name by using the extended form
<subscribe topic="scratch/sample/d_value" variable="temperatureOfSample" />
Please note that wildcards in topics should not be used.
The parameters for the adapter define the connection details
        <parameter name="mqtt.server" value="192.168.2.133"  />
        <parameter name="mqtt.port" value="1883"  />
For the sample, the plain IP-address is given. Use ‘localhost’ or ‘127.0.0.1’ when the mqtt-broker is on same machine.
The MQTT-Adapter is based on eclipse-paho python library and is available on raspberry pi, linux, windows and many more platforms.
For the broker there is mosquitto available for raspberry pi. Just install by
sudo apt-get install mosquitto
This installs the server and starts the server in the background. This is good for a private environment. For a public installation, be sure to look into the docs for securing the environment.
Sample setup
In the scratchClient distribution, there is a sample configuration for a small usage scenario. This requires two computers, as scratch 1.4 with scratchClient can’t be started multiple times on one machine. The sample transmits a button press from GPIO and publishes by a topic ‘scratch/sample/button’ to the second installation, where in scratch a popup is triggered.
The config files are for computer 1 scratch/mqtt/dev_0/device_0.xml
the config files are for computer 1 scratch/mqtt/dev_1/device_1.xml
Be sure to edit the files to have the correct IP-addresses for the mqtt-broker.
On computer ‘dev_0’, there is a button needed from from GPIO17 (BCM) to GND.
   <adapter class='adapter.iotAdapter.MQTT_Adapter'  name='mqtt'>
        <description>interface to a mqtt-server</description>
        <extension>
        <mqtt>
            <publish topic="scratch/sample/button" variable="button" />
        </mqtt>
        </extension>

        <parameter name="mqtt.server" value="192.168.2.160"  />
        <parameter name="mqtt.port" value="1883"  />
    </adapter>
    <!-- =========================================================================== -->
    <adapter class='adapter.gpio.GpioEventInput' name='button_s0'>
        <gpio port='GPIO17'>
            <default dir='IN' pull='PUD_UP'  />
            <active dir='IN' pull='PUD_UP'/>
        </gpio>

        <output name='button_pressed'>
            <broadcast name='s0_high'/>
        </output>
        <output name='button_released'>
            <broadcast name='s0_low'/>
        </output>

        <parameter name='poll.interval' value='0.05' />
        <parameter name='value.inverse' value='true' />

    </adapter>
The scratch code for dev_0 is straightforward.
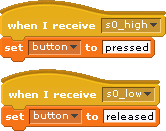
The adapter GpioEventInput sends events ‘s0_low’ or ‘s0_high’ on button release/ press. The parameter ‘value.inverse’ for this adapter switches high/low values. This is needed here as the button is connected from GPIO to GND and a button pressed is electrically a low signal.
The scratch code translates the button events to variable values for the MQTT-Adapter. When the button is pressed, a value ‘pressed’ is set to variable ‘button’. This variable is then sent to scratchClient where the MQTT-Adapter publishes the value with topic ‘scratch/sample/button’.
With a mqtt-client as mqtt.fx this topic can be observed. The client ‘mqtt.fx’ is a java-fx based tool which unfortunately is not easy to execute on raspberry due to missing fx-libraries. I have this tool running on a windows machine.
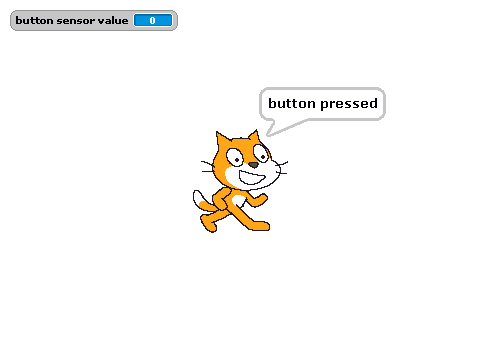
For the second device another computer is needed. The config file (here only a snippet) subscribes to the well known topic “scratch/sample/button” and provides the value for a sensor variable ‘button’ in scratch.
<extension>
 <mqtt>
 <subscribe topic="scratch/sample/button" variable="button" />
 </mqtt>
</extension>
The scratch code is staightforward, the value of the variable is displayed on the stage.

scratchclient is available from the download page http://heppg.de/ikg/wordpress/?page_id=6